evilkaneval
Ruckster
 Hi my name is Justin and I'm a Ruckaholic
Posts: 155
|
Post by evilkaneval on Jan 23, 2009 2:33:43 GMT -5
winter sucks for not scooting but it is a great time for wrenching on scoots. enjoy this process! rebuilding your engine can be a great experience if you take your time and savour it. make sure you've got some good beer on hand and take your time so you're confident it's right.  Agreed. I miss riding so much, but now i get to spend every night workin on the bike, drinkin, listen to the radio and huddeling over a space heater. I just undertook the big bore process, and it was a great project  . I just cant wait to give it a test drive. :(damn roads are coverd in sand/salt/ice . |
|
|
|
Post by andr01dm on Jan 29, 2009 18:48:17 GMT -5
do you have the beefed up head studs from chanito? I do indeed. ^_^ |
|
|
|
Post by andr01dm on Jan 29, 2009 19:06:29 GMT -5
Murphy's Law has struck once again. (I think being a Murphy makes me and my kin more prone to feeling it's effects or something.) The valve guides arrived at Honda and picked them up on the way home from work.. but.. they are not the part that I thought they would be. What I need is the little plastic bits that clip onto the top of the shafts that the valves are in.. which obviously is part of the cylinder head, right? 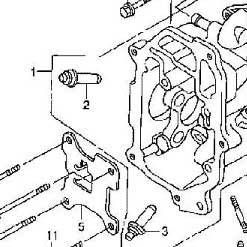 Here's the cylinder head diagram on Ron Ayers and, surely, it's parts number 2 and 3..? They look a bit long but seem to have that cap on top... Nope. Turns out those are metal sleeves that are inserted into the cylinder head, which the new one came with pre-installed. What I need are the little green plastic bits that go up top. The flangy like thing in the above diagram is the washer that goes around the valve guide.. though oddly enough the new ones didn't come with that washer, so why they're showing it here when it doesn't even come with it... *shrug* The part guy at Honda managed to track down the bits that I do want on their system, which uses the same diagrams as the ones on Ron Ayers. It's on the camshaft / valve page: 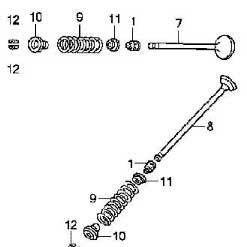 Part #1 in the diagram, "Seal, Valve Stem". Waugh! Why is it on this page when it attaches to the cylinder head, not to the valve stem? Honda's diagrams and manuals are utter s**t. ... So I've ordered a pair of "seal, valve stem" and they'll be in some time next week. Now I just need to get my cylinder and head back from the machine shop. It's been two weeks and I've heard nothing.. think I'll give 'em a call tomorrow and find out when, if ever, they'll get around to it. *sigh* Not a good day... |
|
|
|
Post by Dandy Dan on Jan 29, 2009 21:48:25 GMT -5
Bummer....but glad to hear you got it sorted out now. Perhaps you can use those extra parts as a keychain or something!
|
|
evilkaneval
Ruckster
Hi my name is Justin and I'm a Ruckaholic
Posts: 155
|
Post by evilkaneval on Jan 29, 2009 23:53:59 GMT -5
Honda's diagrams and manuals are utter s**t... I 2nd that notion. I recently had to replace my ECT sensor. Called my local honda parts counter and asked to order one but i didnt have part number. They weren't familiar with the part off hand so they tried to look it up in the parts digram. I told them it was a part that bolts in to the head on the sparkplug side. ???They couldn't find it and said they would need the part# , and to make sure I know what im talking about. ??? So I went to RonAyers, looked up the cylinder head diagram, and found the was no mention of the part, ::) no image of it on the head or off to the side. :'( Eventually i found it in the corner of the crankcase diagram labeled as thermostat unit. >:( It has no business being on that diagram. >:( Supprised they didn't throw the sparkplug there too! (sarcastic). :) |
|
|
|
Post by andr01dm on Feb 4, 2009 4:40:23 GMT -5
I picked up my cylinder, cylinder head and piston from the machine shop (Gord Bush Performance) this morning. They did an excellent job with the bore and decking the mating surfaces of the cylinder and cylinder head. I have a good feeling it'll all go together smoothly this time. :)
Just waiting on the valve seals.. and I shipped my flywheel to JC Racing to get it lightened. Besides, I'm thinking of holding off on the rebuild until the weather is better, so that I can do the break-in rides immediately after the rebuild. Would having the engine sitting around for a couple of months after being assembed, before doing the break-in, be an issue? I don't know...
Meanwhile I'm going to put the old engine back together so I can mount it on the bike's frame and set it down on it's wheels to do some further tweaks to the body.
I've rebuilt the front shocks and will post a photo-essay of that in a new thread.
Thank you all for your advice and encouragment. ^_^
|
|
|
|
Post by timberwolfmadcat on Feb 12, 2009 16:40:14 GMT -5
Ahh... reading this thread brings back memories of my big bore build... I also have done the billion blown headgaskets deal... but recently got a new head.
For a cheaper option than buying the crankcase halves, just look on totalruckus.com for a complete engine... they should only run you about $300, much cheaper than the $700 for the two crank halves 8-)
|
|
|
|
Post by Dandy Dan on Feb 16, 2009 16:20:07 GMT -5
Nice to hear from you Timber....I'm out on the West coast now and I'm going to scooter to Ontario in June for the Mad Bastard rally with another guy from Vancouver (that I haven't met yet). The ride and the rally is going to be unreal....you should join us.
|
|
|
|
Post by andr01dm on Apr 2, 2009 19:21:17 GMT -5
Today was.. interesting.
Finally got my Ruckus up out of the basement a couple of days ago, having to take the engine back out of the frame to do it. Put it back together in the dining room and wheeled it out the front door and around to the back patio where it sat for a couple of days. I was just too busy with work to do anything on it.
Today I worked from home and at lunch I put in the coolant (spilling a fair bit as I had forgotten to transfer the cylinder drain plug from the old crank case.. heh heh), filled up the oil and tried starting it up.
Nothing.
Not even an attempt to crank.
Nada.
Zip.
*sigh*
After working through the afternoon, doing dinner, and walking around the bike a few times checking the electricals I figured I would end up doing a tear down and run through all of the wiring over the weekend.
Then it hit me: "Oh yeah. You have to squeeze the rear brake on."
DOH!
It's been far, far too long since I last tried to start my bike.
I finally managed to get the engine to turn over and run, but only for a few minutes. This is with the rebuilt engine; new crank case, cylinder head, thick big bore gasket, etc., etc.
It had a very hard time starting, needing some extra gas via the throttle to get it to turn over. But it's a start.
That's it for tonight though as it's getting dark, cold and it's going to rain. Wish I had a garage...
|
|
|
|
Post by seansean on Apr 3, 2009 0:18:37 GMT -5
NO MORE NEGLECT!  Love it like your mother! or whatever... |
|
|
|
Post by andr01dm on May 3, 2009 10:23:28 GMT -5
Okay.. so.. after the "fun" I had trying to dial in the carb and then determining that the compression was not up to snuff. (60PSI when it should be >200PSI) I stripped the engine apart, replaced the valves with new ones, checked the piston rings and they seemed okay.
Finally got the bike back together agin this morning, ran it (having to open the throttle to get it to start.. not a good sign) and did a compression test. Still 60PSI. Augh!
I've no idea what's going on and I'm getting pretty fed up with this. :(
Edit: Tried another compression test after injecting 2cc of oil into the cylinder via the spark plug hole. The compression went up to 90PSI. This indicates that it's the pison/piston rings that are leaking.
|
|
shawna
Junior Ruckster
Posts: 58
|
Post by shawna on May 4, 2009 7:12:38 GMT -5
Okay.. so.. after the "fun" I had trying to dial in the carb and then determining that the compression was not up to snuff. (60PSI when it should be >200PSI) I stripped the engine apart, replaced the valves with new ones, checked the piston rings and they seemed okay. Finally got the bike back together agin this morning, ran it (having to open the throttle to get it to start.. not a good sign) and did a compression test. Still 60PSI. Augh! I've no idea what's going on and I'm getting pretty fed up with this. :( Edit: Tried another compression test after injecting 2cc of oil into the cylinder via the spark plug hole. The compression went up to 90PSI. This indicates that it's the pison/piston rings that are leaking. When you said you replaced the valves. Do you mean you got brand news ones? If so, did you check to see if the valves are seated properly and not leaking? Were the valves ground to match the valve seat? Is your compression gauge accurate? I leakdown tester is by far better way to determine where you are losing compression vs a compression tester |
|
|
|
Post by andr01dm on May 7, 2009 11:36:08 GMT -5
When you said you replaced the valves. Do you mean you got brand news ones? If so, did you check to see if the valves are seated properly and not leaking? Were the valves ground to match the valve seat? Is your compression gauge accurate? I leakdown tester is by far better way to determine where you are losing compression vs a compression tester Hi. :) Well.. I ground them to match as best I can. I don't have a machine shop and I'm certainly not a professional mechanic. (Which may be the root of all of the problems I've had.) It's a brand new compression tester so I assume it's accurate.. I don't have any way to test it. I don't have the equipment to do a leak down test. If it comes to that I'll likely have to take it to a shop and get them to do it. Thank you for the advice. :) |
|
|
|
Post by andr01dm on May 7, 2009 11:39:21 GMT -5
Chanito suggested (in an PM) that I check the valve gap.. and I think he may be correct.
I have kept the various intake and outlet valve parts in seperate ziplock bags when the engine was apart, and I had assumed that the old shims would still be accurate. But since I've replaced the whole cylinder head and now the valves the shims may no longer be the right ones.
I have to pick up a better set of feeler gages before I can determine it for certain.. the ones I currently have don't have a useful range for testing the valve gap.
|
|
shawna
Junior Ruckster
Posts: 58
|
Post by shawna on May 8, 2009 10:20:41 GMT -5
Hi. :) Well.. I ground them to match as best I can. I don't have a machine shop and I'm certainly not a professional mechanic. (Which may be the root of all of the problems I've had.) It's a brand new compression tester so I assume it's accurate.. I don't have any way to test it. I don't have the equipment to do a leak down test. If it comes to that I'll likely have to take it to a shop and get them to do it. Thank you for the advice. :) Who did ground the valves and valves to match? If you did it, how did you do it? If you have an decent size air compressor, remove the spark plug. On TDC on the compression stroke. you can tightly seal and shoot air into the spark plug hole and listen to hear if/where air is leaking out out. Intake track or muffler. If you can hear air coming out of either or both. Then your valves are leaking. [quote author=andr01dm board=Aftermarket thread=4586 post=57423 time=1241714361]Chanito suggested (in an PM) that I check the valve gap.. and I think he may be correct. I have kept the various intake and outlet valve parts in seperate ziplock bags when the engine was apart, and I had assumed that the old shims would still be accurate. But since I've replaced the whole cylinder head and now the valves the shims may no longer be the right ones. I have to pick up a better set of feeler gages before I can determine it for certain.. the ones I currently have don't have a useful range for testing the valve gap.[/quote] I think your valve gap is probably off. You have to have virtually no valve gap for the valve(s) to be opening way to soon to have 30-60 psi of compression. I think a quick test is to put the piston at TDC on the compression stroke and just wiggle the 2 rocker shafts. If you can wiggle them feely then I would suspect your valve gap would not be too small. Too large of valve gap would not cause to lose compression due to the valves opening too soon. Valves are opening late in this case. I still suspect your valves are not ground enough to match your valve seats and are leaking past them. |
|
|
|
Post by smartbomb on May 10, 2009 1:36:01 GMT -5
Simply check the valve clearance before you do anyrthing else. This is so basic I am astonunded that you didnt do this on a freshly assembled head.
|
|
|
|
Post by andr01dm on May 12, 2009 22:40:26 GMT -5
Simply check the valve clearance before you do anyrthing else. This is so basic I am astonunded that you didnt do this on a freshly assembled head. I've never assembled a new head before. But, yes, I should have done this. |
|
|
|
Post by andr01dm on May 12, 2009 22:49:53 GMT -5
Finally got my hands on a metric micrometer.. they're very difficult to find in Canada despite our officially using the metric system. :(
I needed it to figure out what thickness of shims I currently have, as the middle digit on each of them was worn away, so I could only see "2?0" and "2?5". Turns out they are 2.10mm and 2.35mm shims.
After some testing of the gap with a new set of feeler gages I've determined that with the old setup my inlet would have been way too tight a gap and the outet would have been slightly too large a gap. So the inlet valve may not have been closing completely and causing the low compression. I'm not sure what the effect of a slightly large gap on the outlet would be.. except perhaps increassing stress on the parts. (?)
I've calculated the thicknesses that I need and will order them tomorrow.. it could be anywhere from a day to a month or more to get them. Hopefully there will be a Powerhouse somewhere in Canada that has them in stock. *fingers crossed*
|
|
|
|
Post by smartbomb on May 13, 2009 12:47:22 GMT -5
If you have access to a surface plate, wet dry paper and some oil, you can lap your shims thinner if its not to far off. Or switch the shims around? If you have some clearance then that probably not the main cause of your compression problem. If you have zero clearance it is. I would pour some solvent down the ports and see if anything is leaking from around the valves.
If not then check the rings, you may have put them in upside down or damaged them in the installation process which was for me, the most diffcult part of building a ruck engine because it was hard to compress the rings while installing the piston/rod/crank from the bottom. It was a 4 hand job.
|
|
|
|
Post by jc250r31 on May 17, 2009 13:18:26 GMT -5
Is the head off right now? You need to pull the intake valve completely out and send a picture. I bet its worn. No other reason the intake should be zero clearance. Unless its an installation error.
|
|