|
|
Post by timberwolfmadcat on Mar 9, 2006 16:07:36 GMT -5
Ok, so im doing this right now, wish i had a laptop right now, anyways. A quick Note if you need a bigger picture, just click on the link, and then click on the pic again at image shack, should end up being a nice full screen pic so you can see what your doing. First Things first, change into some old grubby crap clothes, seeing as youll be on the ground a good portion of the time, and dirt and crap is not easy to get out of clothes. This is a fairly straightforward install, just make sure you got the right tools and you should be fine. All Right, so: STEP 1 VARIATOR HOUSING REMOVAL 1) Remove the Bolt Holding the Airbox onto the variator housing.(Marked in red) This is a 10mm bolt 2) Remove the 7 Variator Housing Bolts(Marked in yellow) These are 8mm bolts  |
|
|
|
Post by timberwolfmadcat on Mar 9, 2006 16:43:34 GMT -5
STEP 2 MAIN BOLT REMOVAL Next we are going to remove the main bolt that holds everything together on the crankshaft. 1) The bolt in red is the main bolt, It is 17mm, and is torqued on with ~18 lb/ft 2) The item surrounded by the yellow circle is the kickstart washer. This should just pull of by hand when the main bolt is removed. This is one part that is very important to put back on right, otherwise youll wreck the crankshaft which is expensive to fix(~$1200 if you get the idea)  |
|
|
|
Post by timberwolfmadcat on Mar 9, 2006 16:55:44 GMT -5
I use a strap wrench, i find it works fairly well, id like a universal holder(PM Chanito for the link on the how to build your own), but im too lazy to make it so, the tools you need to take off the main bolt are shown below. Any rachet will do fine too, i like the long handled one cause it makes things easier.  |
|
|
|
Post by timberwolfmadcat on Mar 9, 2006 17:02:48 GMT -5
3) We're now at the point where we can take the bolt off. Take note on the direction of the hinge on the strap wrench(Red Circle Labelled 3) If you cant figure out which way to put it, just see what direction tightens it. If its down, thats right, and attach it to the Finned Pulley(The Big Pulley located just outside of the kickstart washer). If its up to tighten it, just flip it around. 4) To remove the main bolt, I let the top of the strap wrench rest against the top of the variator casing(Red Circle labelled 4)  Heres a zoomed in view of how to let the strap wrench rest against the top of the casing. Make sure you hold it in place as your taking things apart, otherwise it comes off at very unorportune times   |
|
|
|
Post by timberwolfmadcat on Mar 9, 2006 17:20:36 GMT -5
5) After youve got the main bolt loose, as shown below(Sorry about it being so blurry)  You remove the following 3 parts a) Washer/Spacer  b) Kickstart Washer  c) Finned Pulley  |
|
|
|
Post by timberwolfmadcat on Mar 9, 2006 17:24:01 GMT -5
So in review you should have the following 4 parts 1) Main Bolt 2) Spacer 3) Kickstart Washer 4) Finned Pulley  |
|
|
|
Post by timberwolfmadcat on Mar 9, 2006 17:29:36 GMT -5
STEP 4 VARIATOR REMOVAL This Step is kinda tricky, if you screw it up, it doesnt matter youll just have to find all the little roller wieghts that fall out. This is the variator  So move the belt out of the way, reach behind the variator, you should feel a metal sheet, and pull back. Again this should slide off by hand.  This is my aftermarket, but dont worry about it, the removal and install are the same This is what the two variators look like, and this is what you should have when you remove it.  |
|
|
|
Post by timberwolfmadcat on Mar 9, 2006 17:50:24 GMT -5
There are 5 main components to the variator, you can pull off the top casing now if you want, or, if you messed up in removing it, you probably know all the little parts inside  Heres a quick Rundown 1) Variator Driven Face - If this is scratched, replace it, as it will cause a lot of friction, belt wear, and will probably be killing your performance  2) Spacer - This can be shaved on the stock to give a little more top end speed. Dont bother on the aftermarkets, theyre built for more top end already, all youll do is hurt your performance.  |
|
|
|
Post by timberwolfmadcat on Mar 9, 2006 17:54:26 GMT -5
3) Face plate  4) Spacers - Make sure you dont lose any of these, and make sure they dont fall off during install, otherwise their is a good chance things may break.  5) Roller Wieghts - See the the battlescooter tech section for how to arrange these if they are unevenly wieghted if my pics dont make sense  |
|
|
|
Post by timberwolfmadcat on Mar 9, 2006 18:05:48 GMT -5
STEP 5 AFTERMARKET VARIATOR ASSEMBLY 1) The spacers fit into the face plate into the 3 slots that are cut out. Youll see the spacers are uneven as far as width is concerned. The Wider part faces up in this picture  2) The washer goes into the driven face, I hope you can find out where    3) The wieghts fit into the slots as shown, just follow the color coding for the correct positioning, as these wieghts are uneven, so you alternate them.  4) Put the face plate on top of the variator and your all done  (aside from putting everything back together)  |
|
|
|
Post by timberwolfmadcat on Mar 9, 2006 18:32:16 GMT -5
STEP 6 - VARIATOR INSTALL 1) Taking the Assembled variator, place it back on the driveshaft, making sure the WIEGHTS and SPACERS remain in place  2) Pull the belt back over the Spacer  3) Push the belt together while pulling back to wedge the belt into the rear pulley. This allows you some slack to work with and makes sure everything goes on properly   4) Remove all previous locktite from the threads on the crankshaft if you used locktite. If not, just make sure everything is on tight enough. 5) THIS IS THE MOST IMPORTANT PART TO DO RIGHT. THIS IS WHERE MOST PPL MAKE THEIR MISTAKES. PUSH EVERYTHING ON BY HAND FIRST, DONT EXPECT THE NUT TO TIGHTEN EVERYTHING ON RIGHT You can see the large ammount of slack in the picture, labelled #3. You can do this without pushing the belt into the rear pulley, but its harder to get everything aligned right, and more likely than not youll mangle the crankshaft. And for $1200 i think youd prefer to wedge it down  Now that the warnings out of the way, read carefully a) Push the finned pulley onto the crankshaft (By hand Labelled #1), preferably near the center. You should be able to see the finned teeth on the crankshaft poking out, there should be about 1-2 cm still sticking out. If you cant get it on far enough, just use the spacer from the stock variator and GENTLY tap on the face through the washer with a hammer.  b) IMPORTANT Now, you can put the kickstart washer on(Labelled #2), again by hand. Try and twist it on the crankshaft. If you cant, good, its on right. The hardened kickstart washer will mash the threads on the crankshaft if not put on properly, so this will be mentioned again in the next step.  c) While holding the kickstart washer in place, put on the other small washer and then the Main Bolt BY HAND. Try and turn the kickstart washer again. If it doesnt move, its fine, gently ratchet the main bolt on with a small rachet first, MAKING SURE THE KICKSTART WASHER DOESNT COME LOOSE IN THE PROCESS. If the kickstart washer does come loose, take off the Main Bolt and washer and put the kickstart washer back on, and then go through the above steps again.  d) Alright, so pretty much everything is done. Tighten up the Main Bolt by reversing the strap wrench. Torque on to ~ 32 N*M or 25 LB*ft. If its really difficult to get it together STOP, take everything off, hopefully you didnt mangle anything, and put it back together and try again. MAKE SURE THIS BOLT IS TIGHT!!! OTHERWISE THE PARTS WILL COME OFF, DESTROYING YOUR FINNED WHEEL, CLUTCH, VARIATOR, KICKSTARTER AND CRANKSHAFT. If this happens, it will probably exceed the value of your ruckus for repairs if you get my drift. If you dont have a torque wrench, theres a simply way of approximating. 1) Measure the length of your Ratchet(in Meters). 2) Take a known wieght (in Kg's and Multiply by 9.806, this gives you newtons) 3) Multiply the length by the mass and that will give you the torque you are exerting.  6) Alright, so this one is really just a check to make sure everythings working right before you fire up the engine. Rotate the cranshaft with the rachet on the main bolt until the belt is tight(See below) Notice how much tighter it is than before AFTER  BEFORE  7) All thats left is to put the cove back on, i hope you can handle that. Just make sure you put the little hook that holds the rear brake back where it belongs(second from the right hand side, see pic) and your all done. Reattach the screw for the airbox, and then fly like the wind   |
|
|
|
Post by Jasper on Mar 9, 2006 21:10:43 GMT -5
you can use the closeup function on your camera (the little flower) if you have it  Just one question, how come your kickstarter is not parellel with the floor coz mine is :S |
|
|
|
Post by Dandy Dan on Mar 9, 2006 21:18:46 GMT -5
Here is a more detailed look at the common mistake people make by not creating slack in the drivebelt and thus either aligning the outer face incorrectly or not getting the kickstarter washer started on the splines before they crank the nut tight which mashed the splines. ------------------------------------------------------------- turbowagon's addendum: 1. Before reinstalling the belt, you should test-fit the outer drive face and kickstarter washer to see how much of the crankshaft splines should be showing. You should be able to see the end of the splines protruding from the kickstarter washer: 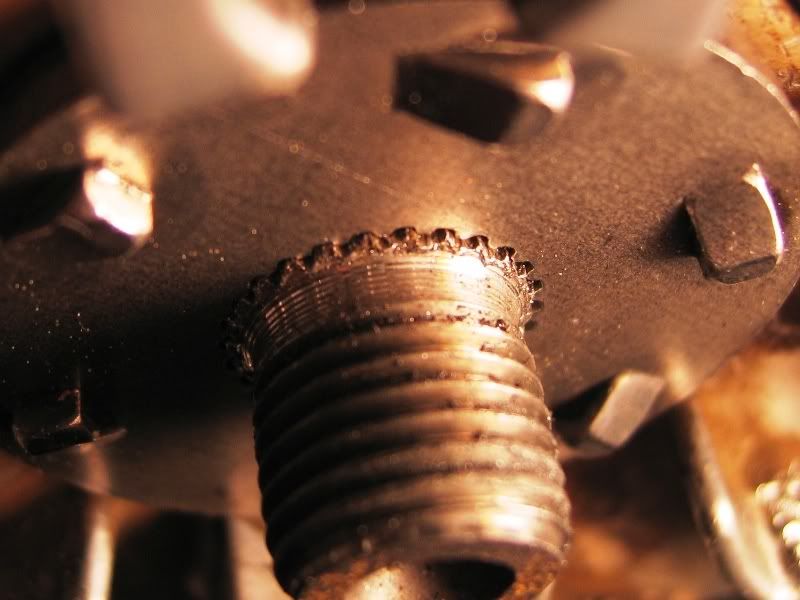 If you test-fit the final washer and nut by hand, you can also see how much of the crankshaft should protrude from the nut: 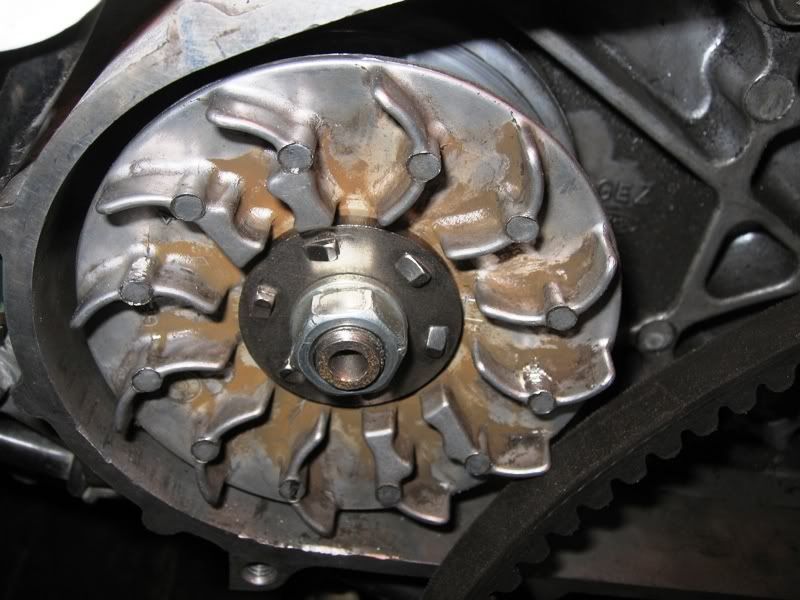 Go ahead and install the belt onto the drive boss (metal cylinder). You can see how the belt is going to hinder the proper seating of the outer drive face: 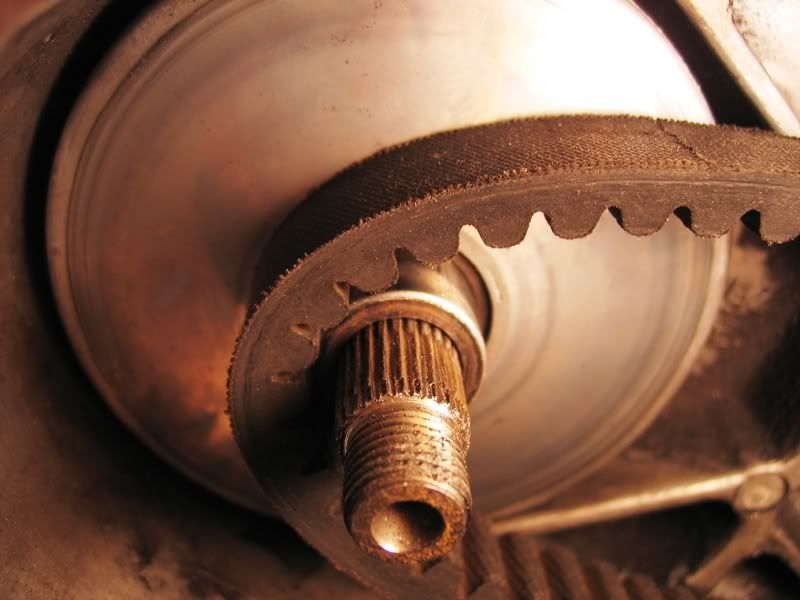 If you simply slide the outer drive face on without creating slack in the belt, it will not be seated correctly. You risk damaging your crankshaft (like I did), and will lose a few MPH off your top end: 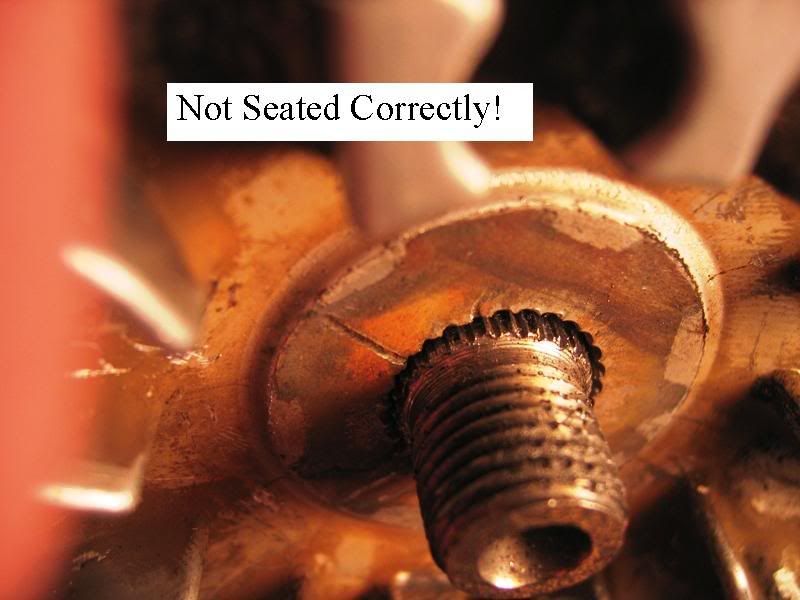 Dandy Dan recommends squashing the belt near the driven pulley to create some slack so that you may seat the outer drive face completely:  With a little wiggling you should end up with this: 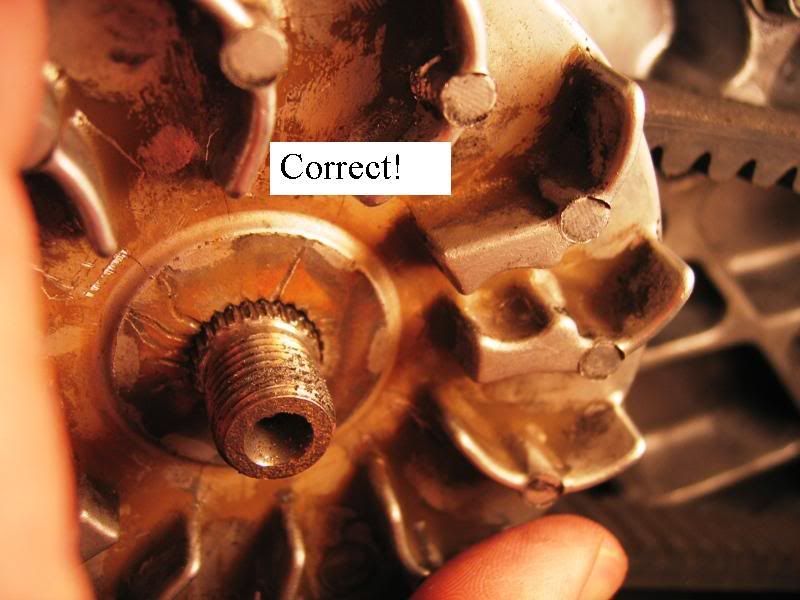 Install the washers and nut by hand first, and then tighten the nut while stabilizing the outer drive face with a universal holder. Reinstall the outer cover and you're done! |
|
|
|
Post by timberwolfmadcat on Mar 9, 2006 23:08:57 GMT -5
My kickstarters angled up cuz it looks sleeker  , i dunno, i moved it with the filter install and it kinda just stayed that way |
|
|
|
Post by Dandy Dan on Mar 11, 2006 15:14:43 GMT -5
Nice Work Timber!
** POOF!*** This thread is a sticky!
|
|
|
|
Post by timberwolfmadcat on Mar 11, 2006 15:50:17 GMT -5
Yay, just lemme know if anythings missing i think i got it all........
|
|
|
|
Post by Dandy Dan on Mar 11, 2006 16:03:07 GMT -5
It's definately the best variator how to out there. You could maybe circle in one of the pics where the variator tool / universal holder attaches and maybe include a pic but that's all I can think of. The strap wrench works fine (better than a lot of ways like jamming old tubes in there) but once you try a universal holder it's impossible to go back. I wish there was a good cheap online source for them.
|
|
|
|
Post by timberwolfmadcat on Mar 11, 2006 23:04:37 GMT -5
yeah, i wish i could find someplace that sells them, the strap wrench works fine for the variator, and the slightly larger one for the clutch. So long as you can rest it up against the casing you dont have to put any force into it. My dads got his digital video camera from work here, ill ask him if i can use it for a little bit, hopefully make a nice install video
Oh yeah, i corrected the bolts sizes on the top. I replaced mine with 10mm heads cause i took them off and on too much, so the stockers are 8mm
|
|
|
|
Post by Dandy Dan on Mar 12, 2006 0:45:57 GMT -5
Do you think I should sell variator tools? I could make some beefy ones for about 6-7$ and sell them for say 10$ plus shipping. It wouldn't really be a get rich quick scheme but I might help a few people out.
|
|
|
|
Post by chanito on Mar 12, 2006 19:30:27 GMT -5
 Great how-to, congrats, and DD you should make those tools ;D
|
|