
Post by andr01dm on Feb 7, 2009 21:42:50 GMT -5
To do this I followed IHeardARuckus' post here: battlescooter.proboards27.com/index.cgi?board=howto&action=display&thread=2698
Unfortunatly the photos in his post are missing.. so I took a bunch while I was doing mine.. I thought they might be useful for other folks who want to do this upgrade to their forks.
Tools & Parts
2 - Ruckus Front Shocks
To remove these from your bike; take off your front tire, remove the spash guard, unbolt both of the bolts at the top of each shock, pull down on the shock to slide it out of the fork top.
2 - Rebound Springs
Order two of Honda part #: 51412-GEV-711 from your local Honda Powerhouse. They're around $5 each.
1 - Snap Ring Pliers
I recommend the Channellock 7-1/2 In. Convertable Snap Ring Plier from Home Depot. About $30.
Tube of Bearing Grease
Standard issue grease should do the trick.
Lots of Rags
Don't use paper towels, they'll just tear and stick to everything. Use fabric rags or the workshop paper towels you can get in a hardware store.
Q-Tips
To get grease out of the top of the fork.
Handful of Wooden Stir Sticks
I 'borrowed' a pile of these from a coffee shop.
Old Newspapers
You'll want to keep your work surface clean.
Butter Knife
Or similar blunt prying tool.
X-Acto Knife
For cutting the bumper.
Metal Hack Saw
For cutting the plastic spacer.
Ruler
To measure how much to cut.
Table Vice
To hold things steady while measuring and cutting.
Sheets of Coarse and Fine Sandpaper
To smooth the cut faces of the plastic spacers.. I also used a Dremel.


Shock Dissasembly
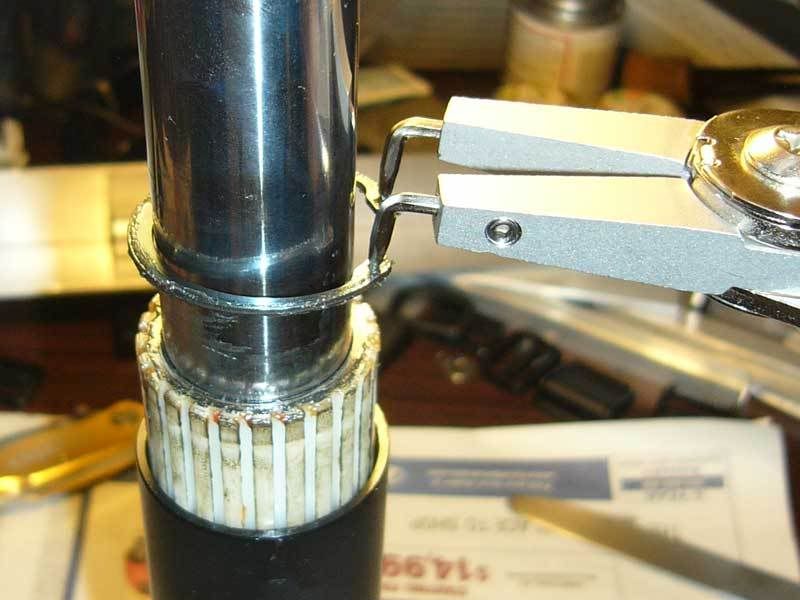
First you remove the dust cover/grease seal. I used the blunt tip of a table knife.. just wedging it into the gap and prying it apart.

Inside there is a bit of old grease which you need to clean out using Q-Tips. Under that is a C shaped retaining clip. It presses outwards into a lip inside the outer tube of the shock.

Take your Snap Ring Pliers and get the tips into the holes of the C clip.. this may take a bit of messing around as the holes in the clip are very small and right up against the side of the tube wall. Then you need to get someone else to help you. Have them press down on the top of the shock, using a pad of paper or something to protect their hands, while you remove the C clip.

After the C clip is out the rest of the shock comes apart quite easily. This is the disassembed right hand shock, which has a rubber bumper.


And here's the left hand shock, the brake side of the front wheel, which doesn't have the bumper.

At this point I gave everything a very thorough cleaning, getting rid of the old, filthy grease.
Next step is to cut down the plastic spacers and rubber bumper. It's 1.6cm (5/8") off of each of the spacers and 1/3rd of the length of the bumper.. which turned out to be 2.5cm (1")


I roughly cut the spacers using a metal hack saw and vice.

Then I used a Dremel and some sandpaper to get them flat and smooth. I cut the rubber bumper with an X-acto knife.

Here's one of the shocks, assembled and ready to go back together. The added rebound spring is in the bottom, center of this photo. It ends up at the bottom of the tall spring inside the main tube of the shock.

Give all of the internal components of the shock a very light coat of grease, then put a bit more at the top of the main spring and on the plastic spacer and the plastic piston.
To re-assemble you need to get your helper to press the shock down while you get the C clip back into it's groove.
You then need to put a bit of grease at the top end of the shock, but not a huge amount of it our it'll come oozing out of the dust seal and you'll be wiping grease off of your shock all the time. But to get a small quantity down in place I found that it worked well if I first over-filled it.

Then took a wooden stir stick and worked it down inside of the shock.

And finally used the stir stick to scrape out the excess grease, leaving behind just a thin smear of it down inside on top of the C clip.

Slide on the dust seal, pop on the end cap and it's done.

Unfortunatly the photos in his post are missing.. so I took a bunch while I was doing mine.. I thought they might be useful for other folks who want to do this upgrade to their forks.
Tools & Parts
2 - Ruckus Front Shocks
To remove these from your bike; take off your front tire, remove the spash guard, unbolt both of the bolts at the top of each shock, pull down on the shock to slide it out of the fork top.
2 - Rebound Springs
Order two of Honda part #: 51412-GEV-711 from your local Honda Powerhouse. They're around $5 each.
1 - Snap Ring Pliers
I recommend the Channellock 7-1/2 In. Convertable Snap Ring Plier from Home Depot. About $30.
Tube of Bearing Grease
Standard issue grease should do the trick.
Lots of Rags
Don't use paper towels, they'll just tear and stick to everything. Use fabric rags or the workshop paper towels you can get in a hardware store.
Q-Tips
To get grease out of the top of the fork.
Handful of Wooden Stir Sticks
I 'borrowed' a pile of these from a coffee shop.
Old Newspapers
You'll want to keep your work surface clean.
Butter Knife
Or similar blunt prying tool.
X-Acto Knife
For cutting the bumper.
Metal Hack Saw
For cutting the plastic spacer.
Ruler
To measure how much to cut.
Table Vice
To hold things steady while measuring and cutting.
Sheets of Coarse and Fine Sandpaper
To smooth the cut faces of the plastic spacers.. I also used a Dremel.
Shock Dissasembly
First you remove the dust cover/grease seal. I used the blunt tip of a table knife.. just wedging it into the gap and prying it apart.
Inside there is a bit of old grease which you need to clean out using Q-Tips. Under that is a C shaped retaining clip. It presses outwards into a lip inside the outer tube of the shock.
Take your Snap Ring Pliers and get the tips into the holes of the C clip.. this may take a bit of messing around as the holes in the clip are very small and right up against the side of the tube wall. Then you need to get someone else to help you. Have them press down on the top of the shock, using a pad of paper or something to protect their hands, while you remove the C clip.
After the C clip is out the rest of the shock comes apart quite easily. This is the disassembed right hand shock, which has a rubber bumper.
And here's the left hand shock, the brake side of the front wheel, which doesn't have the bumper.
At this point I gave everything a very thorough cleaning, getting rid of the old, filthy grease.
Next step is to cut down the plastic spacers and rubber bumper. It's 1.6cm (5/8") off of each of the spacers and 1/3rd of the length of the bumper.. which turned out to be 2.5cm (1")
I roughly cut the spacers using a metal hack saw and vice.
Then I used a Dremel and some sandpaper to get them flat and smooth. I cut the rubber bumper with an X-acto knife.
Here's one of the shocks, assembled and ready to go back together. The added rebound spring is in the bottom, center of this photo. It ends up at the bottom of the tall spring inside the main tube of the shock.
Give all of the internal components of the shock a very light coat of grease, then put a bit more at the top of the main spring and on the plastic spacer and the plastic piston.
To re-assemble you need to get your helper to press the shock down while you get the C clip back into it's groove.
You then need to put a bit of grease at the top end of the shock, but not a huge amount of it our it'll come oozing out of the dust seal and you'll be wiping grease off of your shock all the time. But to get a small quantity down in place I found that it worked well if I first over-filled it.
Then took a wooden stir stick and worked it down inside of the shock.
And finally used the stir stick to scrape out the excess grease, leaving behind just a thin smear of it down inside on top of the C clip.
Slide on the dust seal, pop on the end cap and it's done.

 i was trying to 'picture this' without the photos and it just wasn't working! ha! ordering the springs on monday.