|
|
Post by timberwolfmadcat on Aug 11, 2006 12:46:19 GMT -5
DO THIS WHILE THE ENGINE IS COLD!!!!!Things expand in a hot engine and your measurements will be wrong. Difficulty 2-3(Easy) Problems/Symptoms of something wrong - Hard to Start (gaps to tight) - Loud ticking (related to RPM) (gaps too big) - Running crappy at idle or top end - No powerband Tools Needed - 8,10,12 mm socket/wrenches - Philips Screwdriver (star) - New shims (you can get them later too) - Feeler Gauges(You can get around 35 for $11 or so) -Magnetic Pen or something similar - Some work clothes you dont mind getting a little oil on  Step 1Remove the Battery Box Step 1Remove the Battery BoxIf you cant find out how to do this, you should stop right now and take it in to the shop  This implies you cannot use a phillips screwdriver, which most likely means you dont know how to use a wrench which will make the rest of this that much more difficult    Remove the floorboard/seat Remove the floorboard/seatI'll give you some grace on this one, b/c that stupid bracket on the bottom off the battery box is tricky. Remember to pull out the 2 screws at the front of the floorboard Everything should now look like this roughly 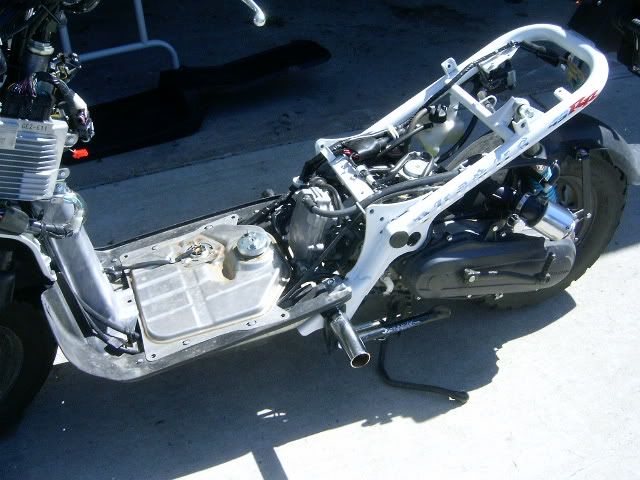
|
|
|
|
Post by timberwolfmadcat on Aug 11, 2006 12:49:36 GMT -5
Step 2Remove the Cylinder Head CoverYessss, easy enough just remove the five 8mm bolts holding it on there. You'll need to pull the crankcase hose off its mounting to get to the bolt behind it. Also, you may want to lift the gas tank up to have more access to the lower bolts. 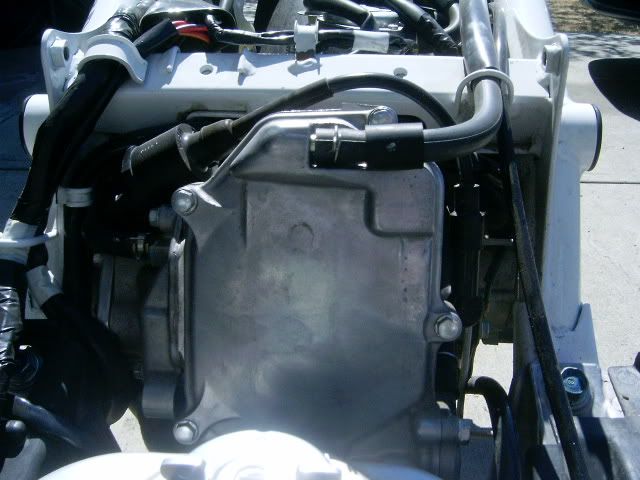 They are highlighted in red in this piccy 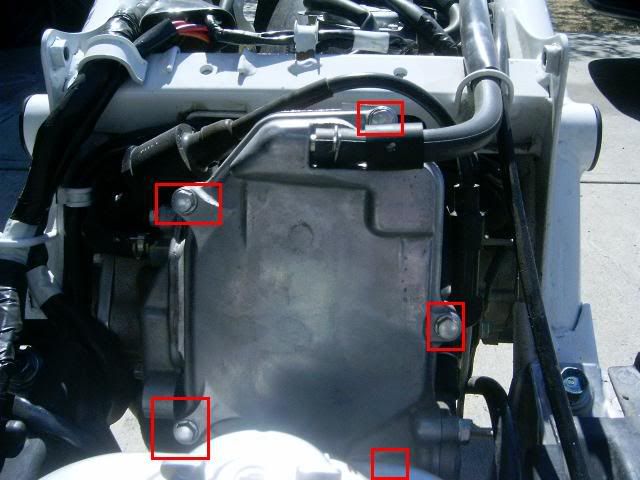
|
|
|
|
Post by timberwolfmadcat on Aug 11, 2006 12:55:41 GMT -5
You should be looking at something similar to this now 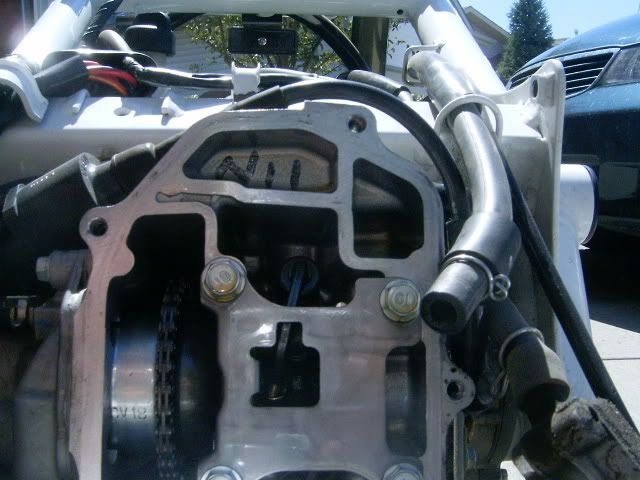 Try not to dislodge the O-ring inside the valve cover loose. If you do it can't be a little annoying to work back in the groove. To get it back in the groove work it in at the 12 O'clock and 6 O'clock positions and then do 3 and 9 O'clock and then halfway between each point (1:30, 4:30, 7:30, 10:30). |
|
|
|
Post by Dandy Dan on Aug 11, 2006 13:12:34 GMT -5
Important Part:With any 4-stroke engine (like ours!) there are 2 TDC's (Top Dead Center..ie. when the piston is all the way up). Essentially, the piston comes all the way up just as it's finishing pushing the exhaust out. Then it goes back down, sucking in fresh air and then it comes back up to TDC as it compresses the air/fuel mix, right before the spark goes off. It is important when you do the valve adjustment, that you only do it when the piston is at TDC of the compression stroke. The other TDC won't work because our engines have 'valve overlap' which means the valves don't close and open exactly when the piston is at the top of this stroke but rather the exhaust valve lingers open even at the piston starts down and the intake valve starts to open even before the piston is all the way up. As a result, if you try to measure the gaps at this exhaust TDC there won't be any gaps because both valves are partially open. This can be terribly confusing if you are trying to measure the gaps and there aren't any. The way to ensure your piston is at TDC of the compression stroke is to keep an eye on the tick marks (as shown a few posts down) as you cycle the engine via the kickstarter. As you cycle the engine you'll notice the marks line up easily one time and then you have to push harder the next time. This is because the piston is harder to push during the compression stroke TDC because you are squeezing the air about 1/12th of the space whereas at the other exhaust TDC it's just escaping out the exhaust valve so there's no pressure building. You'll find that you almost get to TDC of the compression stroke and then suddenly it'll slip way past. That's because as soon as you are past TDC, the compressed air wants to decompress and push the piston back down. Anyways, just take it easy at get the marks lined up during the compression (hard) stroke. It doesn't matter if you are a bit off because the valves are supposed to be closed for quite a while during the preceeding compression stroke and the subsiquent power stroke so you have some room for error. I should also mention that if you have removed the spark plug then the compression stroke will NOT be harder to push because the air will just escape out of here and no pressure will build  Just leave the spark plug in place. With all this knowledge now firmly implanted in your brain, go forth and do the next couple steps ;D
|
|
|
|
Post by timberwolfmadcat on Aug 11, 2006 13:15:26 GMT -5
Step 3 - TimingAlign the Timing Mark on the cam gear with the Stationary Mark on the bracket thingy. 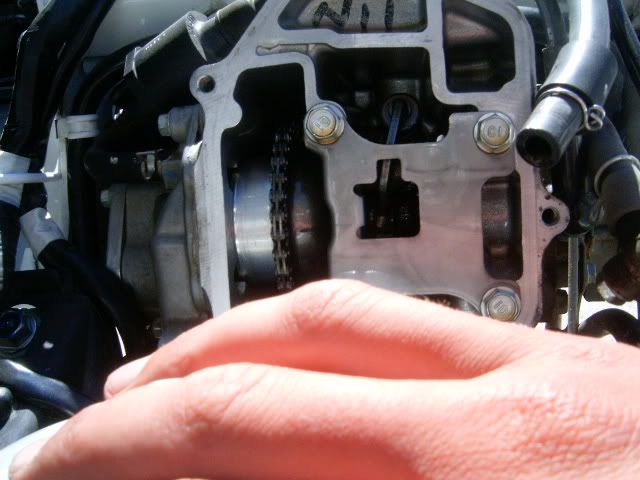 Here's are the marks and positions highlighted The marks are highlighted in yellow 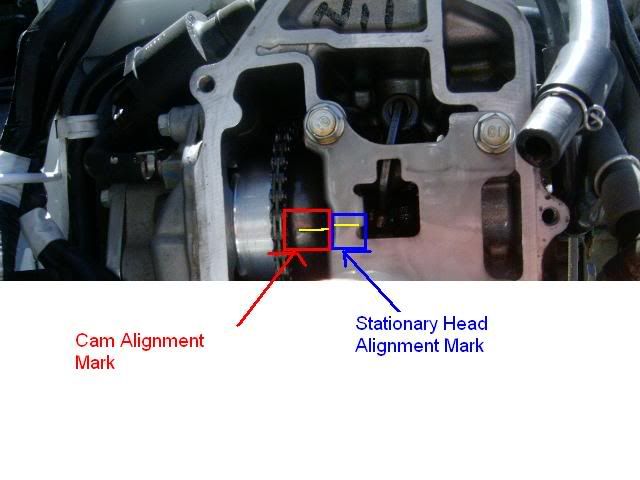
|
|
|
|
Post by timberwolfmadcat on Aug 11, 2006 13:20:57 GMT -5
Step 4 - Checking the GapsSPECIFIED GAPSINTAKE (TOP) - .10mm give or take .03 mm(.004 GOT .001 in) EXHAUST (BOTTOM) - .19 mm GOT .03 mm (.007 GOT .001 in) Using your handy dandy set of feeler gauges ($10): 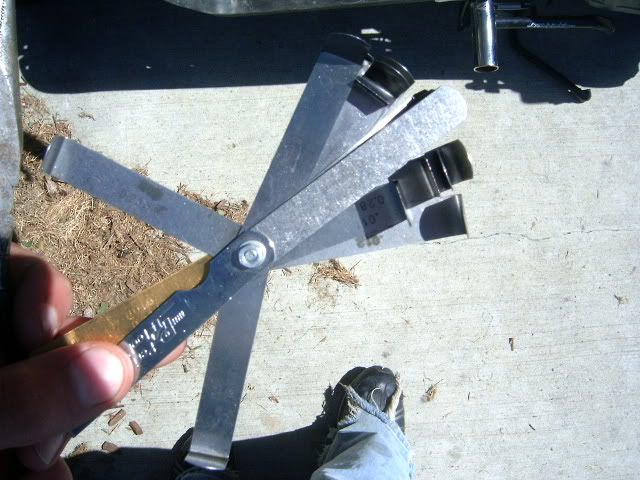 Check the gap by starting with somewhere around .05 mm for the intake and .10 for the exhaust. It should slide in easily (this goes a lot smoother if you have your feelers bent as shown.) If it doesn't go in easily, either your gaps are too tight or you're not at TDC. Continue increasing until it DOES NOT FAIRLY EASILY slide in to the space b/w as shown You can force bigger feeler gauges in there and give an incorrect reading on the gap, so make sure to do this right 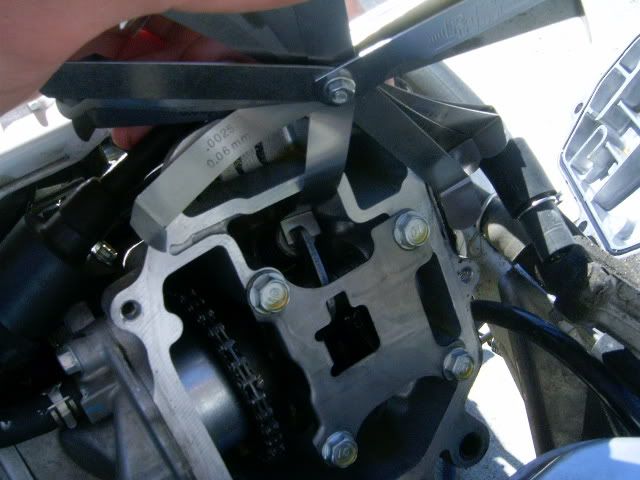
|
|
|
|
Post by timberwolfmadcat on Aug 11, 2006 13:32:51 GMT -5
Step 5 - The MathOnce you've measured the gaps, write them down on a piece of paper. Now the shims in your engine should have #'s on them. Write these down as well. If you can't read them (they get worn) then slide the rocker arm to one side and using a magnet or pliers remove the shim and hold it up to the light at an angle. If you still can't read the number go use a caliper to measure how think it is. As a last resort, go out and buy maybe a 170 shim and then re-measure the clearances, it makes things easy when you get a nice divisible by 10 shim it makes adding easier, anyways......  . BTW, a 170 shim is 1.70mm thick. Honda's shims come in increments of 0.025mm so they actually go 1.700mm, 1.725mm, 1.750mm, 1.775mm etc. However, Honda just writes, 170, 172, 175, 178 on them. First I'll give the formula then explain it: A = (B-C) + DA= New shim thickness B = Recorded Valve Clearance C = Specified Valve Clearance D = Old Shim Thickness
|
|
|
|
Post by timberwolfmadcat on Aug 11, 2006 13:41:00 GMT -5
The shims for the Ruckus are a standard 7mm Honda shim. Often your Honda parts desk won't believe you that a little scooter uses the same shims as a CBR. Don't settle for them ordering you in one, in the size you need because ALL Honda dealerships have box of shims that their mechanics use probably daily to tune bikes. They should let you buy one of these or even just trade you for your old shim. So, for all crazy sake, lets say you measured your intake gap as .15mm and your exhaust as .24mm CORRECTING INTAKEYou measured your intake gap to be .15 mm The specified valve clearance is .10 mm This means your gap is 0.05 mm too big so you need a .05 mm THICKER SHIM to take up that space. You measured the gap with a 170 shim, so this means your new intake shim should be a 175. Simple enough isn't it  CORRECTING EXHAUST CORRECTING EXHAUSTYou measured the Exhaust gap at .24mm The specified Clearance for the exhaust is .19mm This gives you the need for a .05mm THICKER Shim You measured with a 170 mm shim, so your new exhaust shim should be a 175. |
|
|
|
Post by timberwolfmadcat on Aug 11, 2006 13:48:04 GMT -5
|
|
|
|
Post by timberwolfmadcat on Aug 11, 2006 13:54:38 GMT -5
This should explain well enough, push it the other way for the exhaust gap 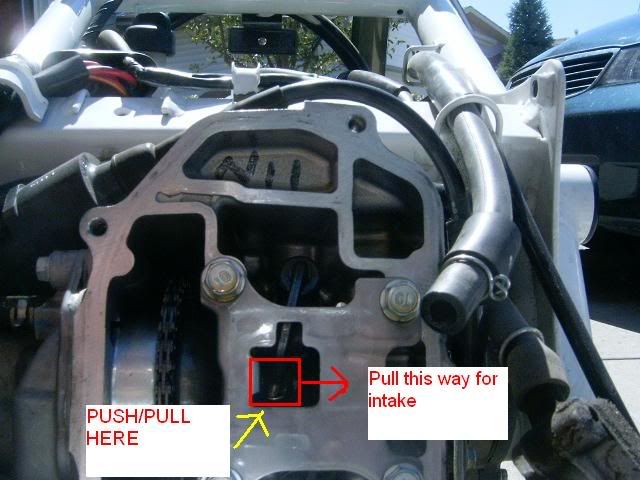 |
|
|
|
Post by timberwolfmadcat on Aug 11, 2006 13:56:26 GMT -5
Using your handy magnetic pen remove the shim. Dont use pliers (unless you're ballsy like Dandy Dan) because if you drop the shim in your engine you might destroy the poor ruckus engine if you can't find it. A magnet is essential to have on hand because if you do drop it you'll likely need one to get it out. Fortunately, your shim won't disappear into the main part of your engine unless it falls down where the chain comes from. 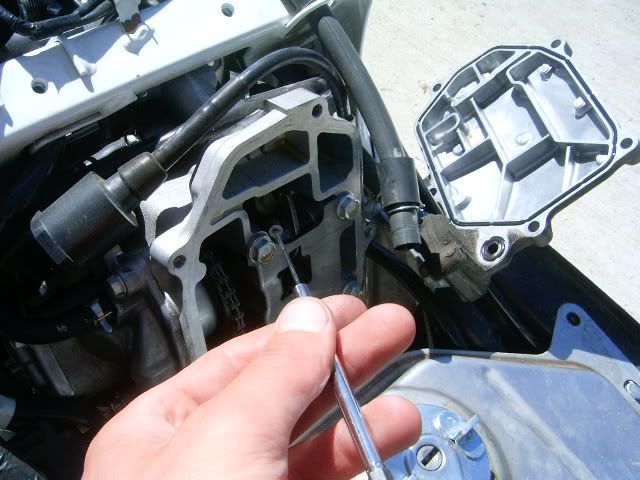 And then replace it with the new shim in the same manner Lightly push down on the top of the rocker arm (the side near the shim) and it should spring back into place (make sure your shim is all the way or it may knock it loose. I suggest you don't let the rocker arm spring back but rather guide it back). Do the same thing for the exhaust shim (its a little trickier to do and take pics as its underneath, but you get the idea). The only difference other than being more awkward is that you push the rocker arm to the left instead of the right. 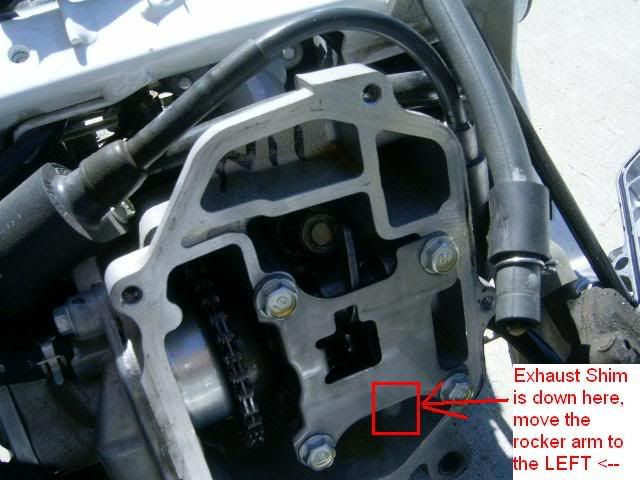 |
|
|
|
Post by timberwolfmadcat on Aug 11, 2006 15:03:24 GMT -5
Next, push all rocker arms back to their proper positions, if they don't seem to be going on just give the kickstarter a couple pushes and everything should sort itself out. Now, check that the O-ring on the cylinder head is still in good condition, otherwise youll get an oil leak, and oil leaks are BAD  There isn't really any pressure on this O-ring though so it should be fine. 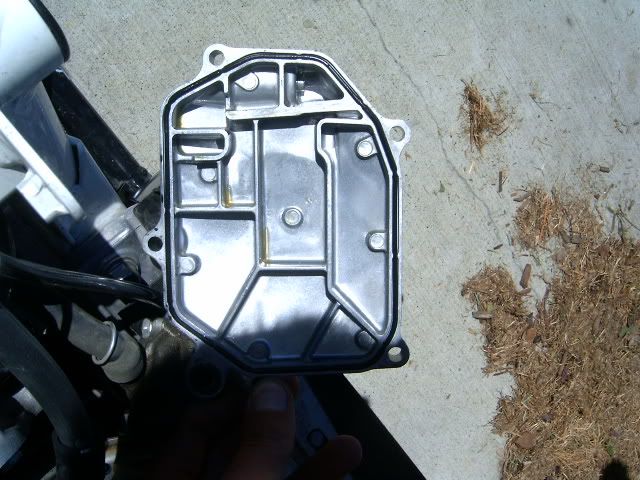 It should look something like the above pic. Notice how it's massaged into the edges so everything is smooth. Worst comes to worst, just give it a LIGHT trim on the top with some scissors(NO, i didnt just say to cut the o ring  ) My old one didnt fit, i ordered a new one, it still didnt fit, so i just trimmed it (so did Dandy Dan ;D). Make sure you trim it on the top though since almost no oil hits there anyways and overlap it a little so it still seals. Replace the cylinder head cover, tighten the bolts
NOTTTT TOOO TIGHTTT!!!!!!!I cannot empasize this enough, if you strip this, we are dealing with a huge PITA so please dont overtighten these. I did on my new one, and luckily it was just the bolt that stripped and not the cylinder head. Just a light tighten, maybe full force right by where the socket is should do. Dont use the full length of the wrench. There is almost no pressure on this cover so you just need it tight enough so that the O-ring seals. Reattach the Engine Breather hose, and put the floorboard and batt box back on, and then fire er UP!!!  |
|
|
|
Post by Dandy Dan on Aug 11, 2006 15:32:02 GMT -5
Nice pics Timber! Dummies should be able to do this ;D
As a tip...I write down the sizes of the shims that I put in there in my service manual and I also have a list of all the sizes I own so even if the #'s get worn off I can just check what size it is or figure it out by a process of elimination. Sometimes it seems impossible to read what it says but if you take it to a nicely lit area and get the light glancing off at just the right angle you'll be surprised what you can see.
Alternatively, if you have good caliper you can just measure the shims instead of trying to read the worn off numbers.
|
|
|
|
Post by timberwolfmadcat on Aug 11, 2006 19:06:28 GMT -5
Nice pics Timber! Dummies should be able to do this ;D As a tip...I write down the sizes of the shims that I put in there in my service manual and I also have a list of all the sizes I own so even if the #'s get worn off I can just check what size it is or figure it out by a process of elimination. Sometimes it seems impossible to read what it says but if you take it to a nicely lit area and get the light glancing off at just the right angle you'll be surprised what you can see. Oh, one last thing, when installing shims, install them with the #'s down, this helps keep them on there a little longer |
|
|
|
Post by Dandy Dan on Jan 15, 2007 9:53:45 GMT -5
I just re-read this how-to over and it's really great...very easy to follow and the pics are good. IMO, it's the #1 valve gap how-to out there.
I also updated my post in the middle because I now feel that it is NOT okay to do this at TDC of the exhaust stroke, it should really only be done at TDC of the compression stroke because there is valve overlap at TDC of the exhaust stroke so neither valve will be completely closed so you'll just screw up your valves more by trying to measure the gaps. Hopefully I didn't make this too confusing when I explained it up above.
|
|
|
|
Post by Dandy Dan on Jan 15, 2007 14:47:38 GMT -5
One other tip, the wierd O-ring that goes in the valve cover usually stays in it's groove but sometimes it comes out. If it does come out try and work it back in without stretching it but put it in the groove and the 3 O'clock and 9 O'clock positions and then split the difference between those points working it in at the 12 o Clock and 6 O'clock positions. This splits up the slack evenly so you don't end up with a whole bunch of extra like you do if you start at one point and work your way around. Keep splitting the difference between the points until you have it all the way in.
Sometime for whatever reason the O-ring is just too long to be worked back in and then you'll either have to buy a new one which is cheap (maybe $5) but then you've got downtime. My solution is just to cut a short piece of it out at one of the straight sections. Don't cut so much out that you have a gap, just take a bit out and then overlap the ends so it still seals. IMO, this seal isn't extremely important like other seals and gaskets are because there really isn't much pressure behind this cover and there isn't oil directly sitting on it, just splashing on it a bit so it should still seal fine. If you do remove a bit of O-ring then it's a good idea to do it at the top also just so there isn't oil running down the crack looking for an escape.
|
|
|
|
Post by timberwolfmadcat on Jan 15, 2007 16:51:15 GMT -5
One other tip, the wierd O-ring that goes in the valve cover usually stays in it's groove but sometimes it comes out. If it does come out try and work it back in without stretching it but put it in the groove and the 3 O'clock and 9 O'clock positions and then split the difference between those points working it in at the 12 o Clock and 6 O'clock positions. This splits up the slack evenly so you don't end up with a whole bunch of extra like you do if you start at one point and work your way around. Keep splitting the difference between the points until you have it all the way in. Sometime for whatever reason the O-ring is just too long to be worked back in and then you'll either have to buy a new one which is cheap (maybe $5) but then you've got downtime. My solution is just to cut a short piece of it out at one of the straight sections. Don't cut so much out that you have a gap, just take a bit out and then overlap the ends so it still seals. IMO, this seal isn't extremely important like other seals and gaskets are because there really isn't much pressure behind this cover and there isn't oil directly sitting on it, just splashing on it a bit so it should still seal fine. If you do remove a bit of O-ring then it's a good idea to do it at the top also just so there isn't oil running down the crack looking for an escape. DD, ive had the same problem with it being too long, i bought a new one and it was still too long  i agree, just a little cut, and make sure you put the gap on the top so oil has a harder time leaking out and all its good ;D |
|
|
|
Post by Dandy Dan on Jan 15, 2007 16:54:33 GMT -5
If someone is really paranoid they can slowly cut off more and more off the O-ring until the length is perfect and then superglue the ends together but IMO it's fine to just overlap them a few mm or even if there's a gap you should still be fine. The unlikely worse case scenario is that you lose a couple drops of oil every 100 miles and which time you could just pony up for a new one which hopefully fits unlike Timberwolfs.
|
|
|
|
Post by chanito on Jan 15, 2007 19:37:40 GMT -5
|
|
|
|
Post by Dandy Dan on Jan 16, 2007 9:27:44 GMT -5
Really? Why would that make it shrink?
|
|