Well since the pictures aren't working for me, I figured I'd try and add to this thread to help anyone else wanting to do this.
This was how it went for the install of my Mallosi yellow spring, which from what I understand, is about 3 - 5 percent stiffer than the stock spring and should increase low end gearing push, and cause the bike to stay in higher RPMs for longer before switching to it's "High Gear" . This mod is better for someone in an area where they are not as concerned about keeping all of their top speed, but need more hill climbing power or better push in the 0-30 range. You WILL have to adjust your variator weights accordingly after a test drive to determine how much this mod has affected your bike. I recommend having AT LEAST, all available power mods other than the Big Bore to be able to get much use out of this. The Big Bore should make even better use of this mod. I also intend to shave about 1/32" off the inner lip of the drive pulley face that contacts the boss in the variator assembly in order to allow the KN to get a slightly taller gear at high speeds. This was pioneered by member 14HueJass of TotalRuckus if you need more info. The Red spring that IHAR used is even stiffer than what I used, and I have serious doubts that it can be used without the Big Bore.
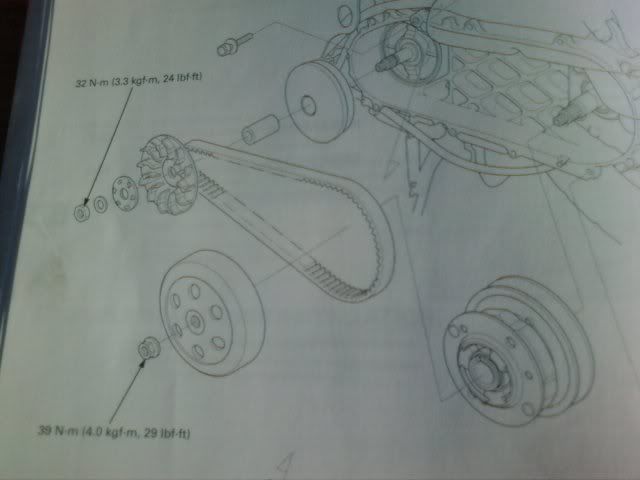
ONWARDSo to start off we open up to section 10-2 or 10-3 in your 06 Ruckus manual. Take a good look at the diagrams and the torque values and a swig of your tasty malt beverage. AHEM- LETS BEGIN!!!
Here we have my crappy camera phone pics (sorry it's all I got right now)...
Starting with the diagram of how it all goes together and the TQ values.
Of course this is assuming you know how to remove the variator/clutch cover...
Next up is the layout front to back of the main components of the variator and clutch assemblies. On the left is the drive pulley face for the variator with the nut, washer and ratchet gear, all stacked on top of it. Following behind that are my KN variator and the drive face boss standing upright just beyond it.
On the right we have the clutch outer bell and nut. Behind it is the clutch assembly we will be working on. Pay no attention to the fact that this picture was taken AFTER the install of the new yellow spring.

Now here is the part that freaked me out. This would benefit MUCHO from having a friend help hold but can be done on your own. You might wanna put on some "stunna shades" to "protect yourself b4 ya wreck ya self", if you know what I mean.
Oh and do yourself a favor and get a big fat marker that your friend stole from some girls house as he "excused" himself and ninja-bounced one night... Or just use what you got.

Use the marker to mark a spot on the clutch assembly and then behind it on the driven face ,making sure that the marks line up. This helps later on when you want to put it all back together the way that it was.
Now kneel on one side (or both) of the assembly while using a pair of needle nose pliers to remove the stopper ring clip that sits in a groove on the face of the assembly. This clip is what keeps it all from flying apart. Now try not to EF it up in the removal if you think you can get away with reusing it. As a replacement one is $1.10, I recommend you just get a new one. It is basically a capital G shaped clip that wraps around the splined area in the center of the picture.
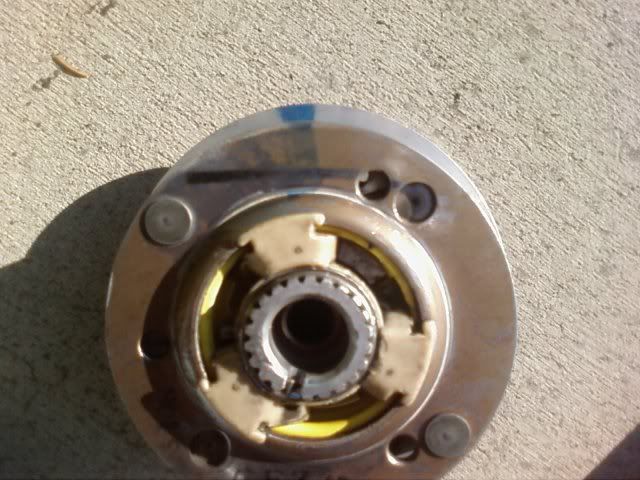
And here kneeling before the almighty clutch, getting ready for anything... At this point I have removed the clip and am slowly wiggling the outer part, up and off the center silver colored splines.
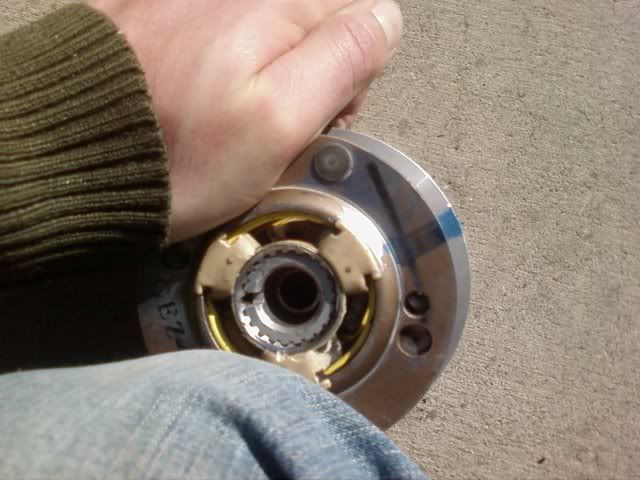
Now mine didn't come "exploding" off and took a little persuasion. I just kept lightly tapping the very center part it and it wiggled it's way up. If you are nervous about this part you could cover it with a towel and then if it does pop off unexpectedly, all your parts stay nearby and don't jump up and hit you. After it pops up, remove the top of the clutch
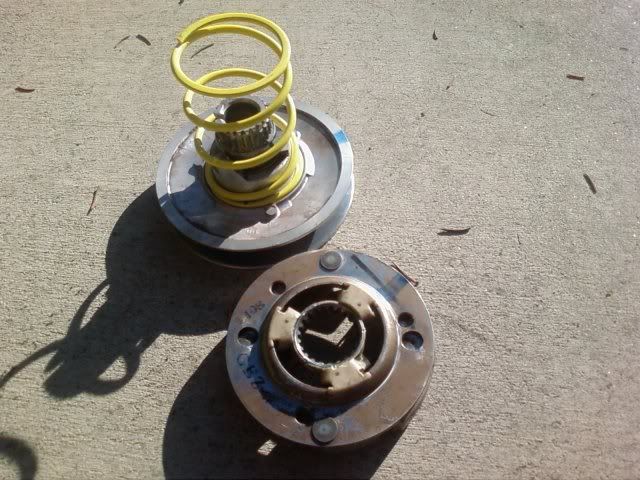
and lay out the parts. They should look something like this...
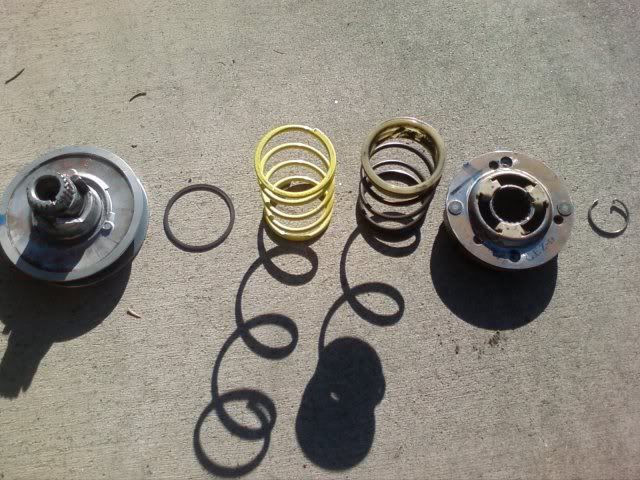
So from right to left we have
1. G shaped stopper ring clip
2. Top of clutch assembly with clutch pads and launch springs. This is a good time to upgrade to blue or pink springs in here which will increase the RPMs at which your Ruckus takes off. RuckinEMT at TotalRuckus hooked me up with these or Battlescooter sells them as well. Gotta give props to my boys- YA KNOW?
3. The stock spring with it's plastic "spring collar" which does not fit in the new yellow spring due to the slightly smaller inside diameter of the yellow spring. We'll deal with that in a minute.
4. New fancy Mallosi yellow spring. It's just a hair taller than the stocker and a little stiffer.
5. Little metal "spring seat" that sits over the shaft of the driven face at left.
6. Driven face/moveable driven face assembly.
Now put the spring seat (#5) back where it belongs (it's rather obvious), and grab the yellow spring. Take a look at both ends. See how one end is sort of welded together and the other doesn't touch all the way?
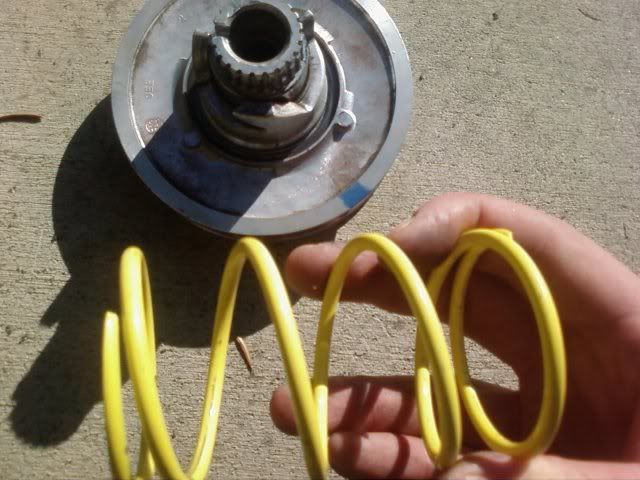
Good, now take the not touching end like we have on the left of the above picture, and put it down into the spring seat. It doesn't seat all the way at first, so twist it clockwise while pressing down and you should hear it "click" down into place. It should also LOOK like it is seated now. So back to this pic...
Now without using the plastic spring collar, put the top section back on and align the marker lines you made and get ready to push like YO MAMMA DID...

The purpose of the marks we made earlier was to make sure that the three gear type tabs that were sticking up from the driven face align with the three holes around the center of the upper assembly. This way, when the belt wedges the two pulleys apart, the moveable driven face moves up into those holes. If you did everything right, you should be able to push down on the upper assembly with your palms while grabbing the moveable driven face and pulling it up into where the holes are. If it all works good, kneel on the assembly to compress the whole thing to the point where the groove for the clip is accessible. Now put the G shaped clip over the splines and in to the groove. You may have to press it in gently with a punch or flat headed screwdriver to get it to seat. MAKE VERY SURE IT IS SEATED ALL THE WAY AROUND BEFORE CAREFULLY LETTING OFF PRESSURE!
Now slam the rest of that malty beverage and finish up. ;D
Slide the belt in between the pulleys and pull them apart a little to get the belt down in it a bit. This will help with getting the belt back over the variator boss and installing the variator drive pulley face far enough onto the splines that you have some still sticking out for the kickstart ratchet plate to slide onto the splines. Now reinstall the clutch assembly and belt on the rear splines.
Now replace the clutch bell and torque it's 14mm bolt to 29 lbft or 39 N-m (4.0kgf-m)
And the variator bolt to 24 lbft or 32 N-m (3.3kgf-m)
Now go ride and decide what weights you want to change to in your variator. Heavy for top speed and less take off and light for good take off but not as much top speed.


 Take it apart again and relube the sliding surfaces and try again