|
|
Post by chanito on Oct 3, 2006 5:44:51 GMT -5
 The idea sound good, but i abhor multiple filters, the only extra filter should be for the PAIR system in case the reed valve goes wrong 
|
|
|
|
Post by Dandy Dan on Oct 3, 2006 10:52:31 GMT -5
Why don't you like multiple filters? I think it looks cooler but I guess if you want a cleaner look then 1 is better. Perhaps I could simplify things to 2 filters and use a 'T' connector to plug the PCV and carb breather into one and then the crankcase breather exit and main intake would be the other.
|
|
|
|
Post by turbowagon on Jun 12, 2007 8:14:24 GMT -5
Just a quick note / tip: Ensure that outer drive face (finned pulley) is flush with the drive boss (the metal cylinder that protrudes from the variator) when installing the kickstarter washer. You can check this by first test-fitting the outer drive face WITHOUT the belt, just to see how far it is supposed to go on. It takes a little bit of effort to finagle the belt to ride up the drive face enough so that the outer face seats completely. There should be enough of the crankshaft splines protruding so that the kickstarter washer fits on nicely. You should be able to thread the final nut w/ washer on by hand and still have the tip of the crankshaft emerge from the nut. If you do not do this, you will end up with a mangled crankshaft: 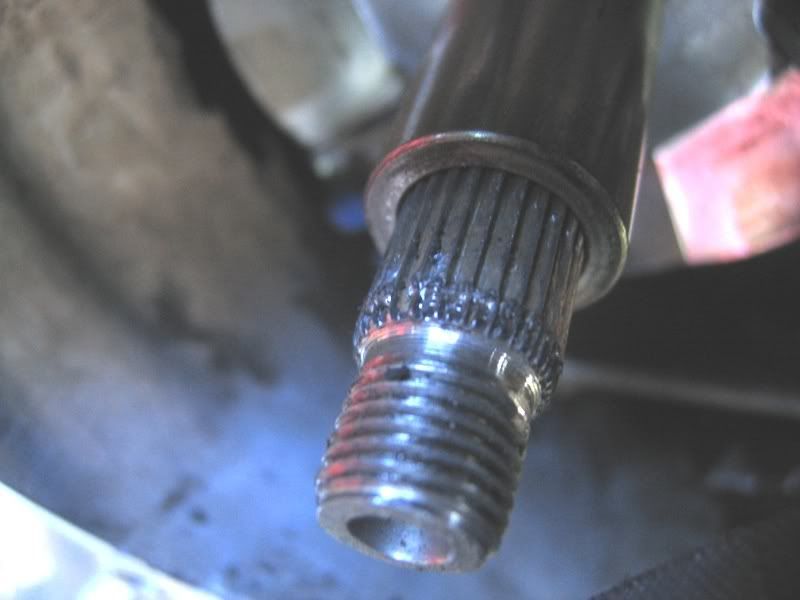 |
|
|
|
Post by chanito on Jun 12, 2007 18:23:26 GMT -5
;D Thanks for the update, we should probably organize this how-to a little better  |
|
|
|
Post by turbowagon on Jun 13, 2007 7:53:37 GMT -5
Good idea, Chanito. I took a few macro photos that illustrate the final steps to the installation. Maybe they could be added to the beginning of the thread. ------------------------------------------------------------- turbowagon's addendum: 1. Before reinstalling the belt, you should test-fit the outer drive face and kickstarter washer to see how much of the crankshaft splines should be showing. You should be able to see the end of the splines protruding from the kickstarter washer: 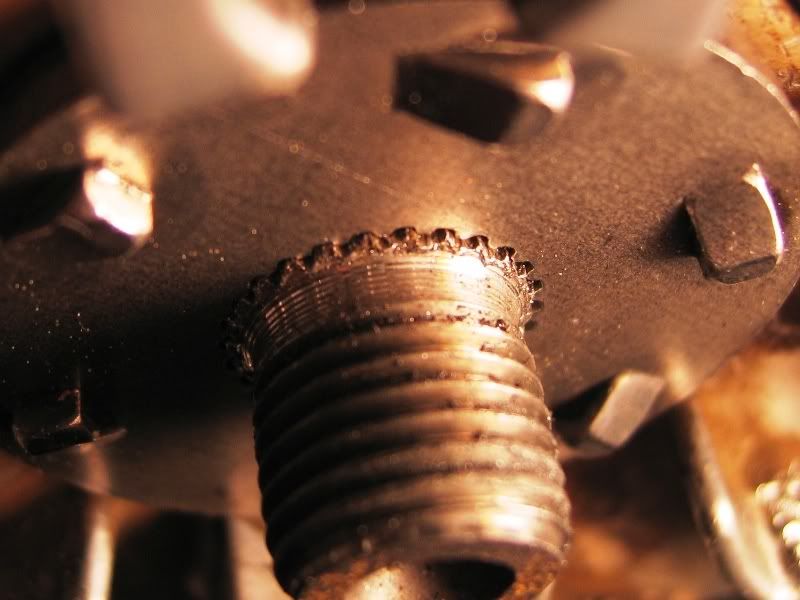 If you test-fit the final washer and nut by hand, you can also see how much of the crankshaft should protrude from the nut: 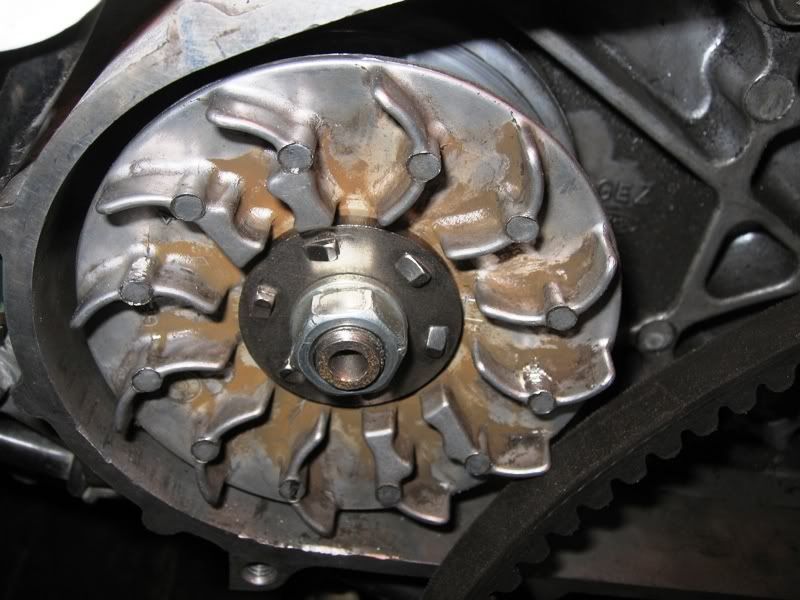 Go ahead and install the belt onto the drive boss (metal cylinder). You can see how the belt is going to hinder the proper seating of the outer drive face: 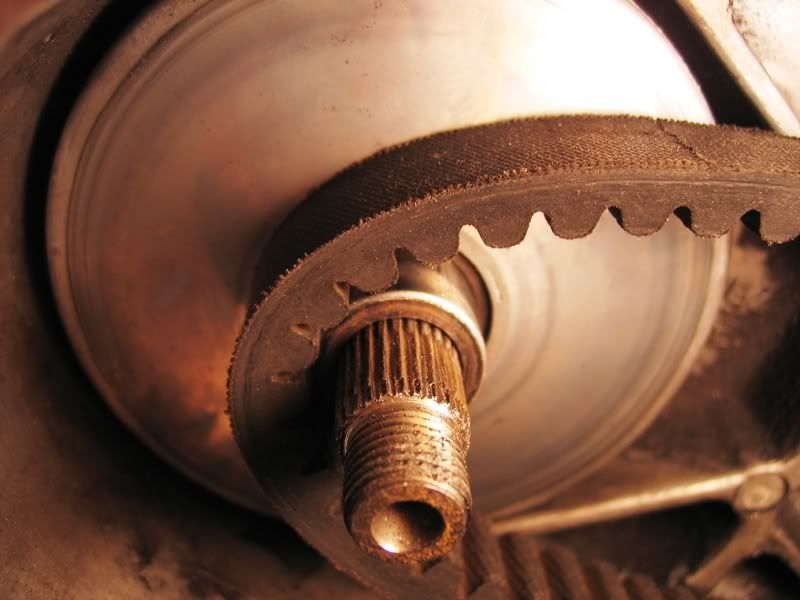 If you simply slide the outer drive face on without creating slack in the belt, it will not be seated correctly. You risk damaging your crankshaft (like I did), and will lose a few MPH off your top end: 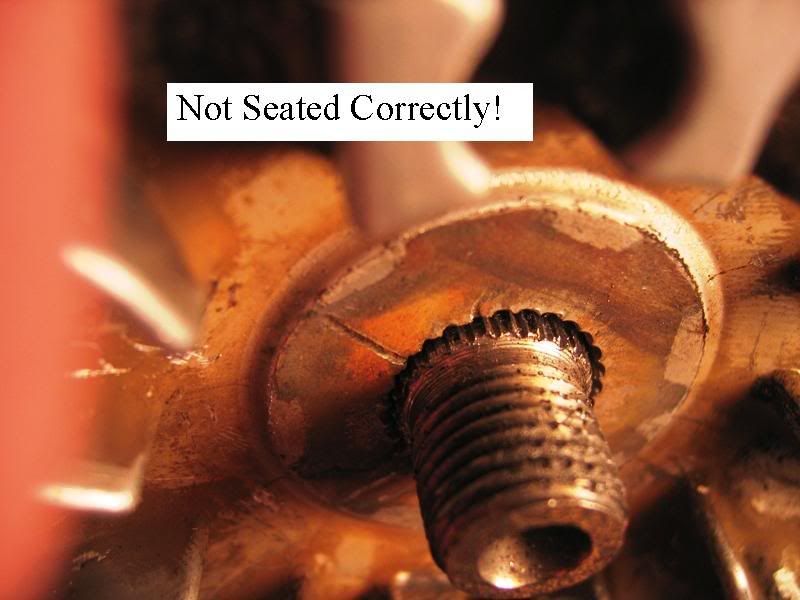 Dandy Dan recommends squashing the belt near the driven pulley to create some slack so that you may seat the outer drive face completely: 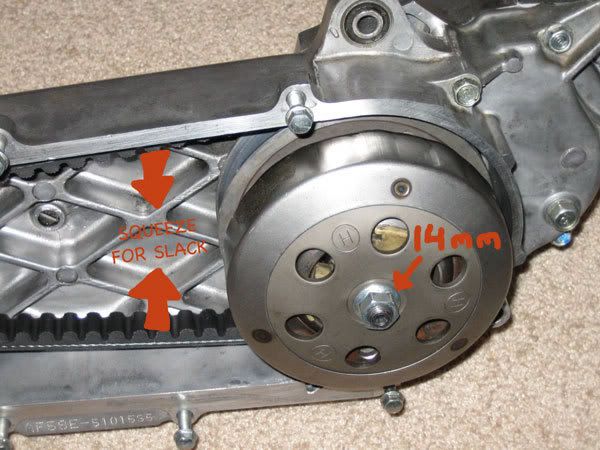 With a little wiggling you should end up with this: 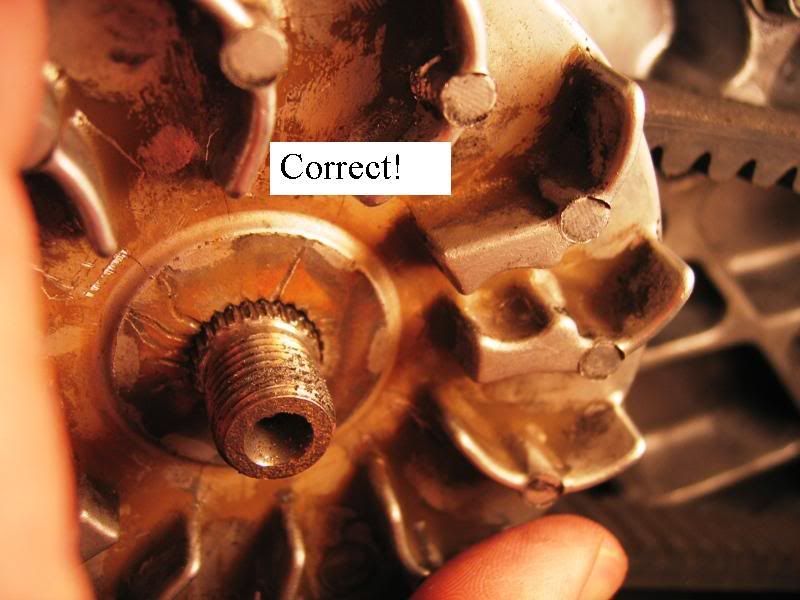 Install the washers and nut by hand first, and then tighten the nut while stabilizing the outer drive face with a universal holder. Reinstall the outer cover and you're done! |
|
|
|
Post by Dandy Dan on Jun 13, 2007 8:25:14 GMT -5
Wonderful post and great pictures! Not getting the kickstarter washer started on the threads is probably the #1 boo boo people make with the variator install. I should also mention that it's fairly easy to get the washer on the splines correctly but then have it pop off while you slide the other washer and nut on. I normally tighten the nut with my right hand while I hold the kickstarter washer on the splines with my left hand. Then I make sure the nut is on far enough to hold it there before I let go of the kickstarter washer and crank the nut tight. BTW, it looks like you've really mastered the macro setting on your camera! Nice work  Oh and I'm adding your post to the front page of this thread now. |
|
|
|
Post by damnsilly666 on Jun 25, 2007 1:09:11 GMT -5
cool how to. just installed the polini kit. Didn't have a starp wrench tho. had to use a rag. But the rollers that came with the kit didn't have any weight i.d. numbers. So I used the 3 grey and 3 yellow. Not sure what it did tho, didn't feel much of a difference. Is that set-up for more high speed? Thanks
|
|
|
|
Post by Dandy Dan on Jun 25, 2007 14:48:59 GMT -5
If you went all yellows you'd get a bit better acceleration. The yellow are 5.6g and the greys are 7.2g. I prefered my polini with all yellow.
|
|
|
|
Post by Kami no Chiizu on Jun 25, 2007 16:36:44 GMT -5
I run mine with the mixed weights, and gained 2 mph on the top in my '04. With all yellows, it felt way weak.
|
|
ezp
n00b Ruckster

Posts: 43
|
Post by ezp on Jul 26, 2007 12:43:32 GMT -5
hey chums, do I have to have these tools or can I get by without? I want to go into my stock variator and look at the rollers to see if they have flat spots....
|
|
|
|
Post by Dandy Dan on Jul 26, 2007 16:16:33 GMT -5
|
|
|
|
Post by Kami no Chiizu on Aug 2, 2007 23:24:04 GMT -5
We used a pipe clamp.
|
|
|
|
Post by Dandy Dan on Aug 3, 2007 12:59:48 GMT -5
A pipe clamp? How?
My first time I stuck a pair of needle nose pliers into the holes and then I used something like a pipe clamp to hold the pliers still while I loosened the nut but I don't see how you'd do it with just a pipe clamp.
|
|
|
|
Post by Kami no Chiizu on Aug 3, 2007 13:35:58 GMT -5
Maybe we're calling something different a pipe clamp. It fits around the thing like a strap wrench.
One day, I'll actually post the pictures from Ryoko's variator install.
|
|
|
|
Post by Dandy Dan on Aug 3, 2007 14:22:54 GMT -5
Whoops...my bad! I was thinking of a pipe WRENCH  |
|
|
|
Post by Kami no Chiizu on Aug 4, 2007 13:22:14 GMT -5
Well, there you go.
|
|
|
|
Post by mtmade1964 on Aug 7, 2007 11:55:08 GMT -5
OK then. So, I really screwed the pooch!!! I got bored, so I went out to change the weights in my variator and put the heavier spring in behind the clutch. I should have looked at this beforehand. My variator flew apart within 15'. Now I am missing two of the small inside plastic clips from my Daytona variator as well as the kick-start washer. Great F'in day. So, am I going to have to buy a new variator or can I replace theses small parts? What about the washer, do I need to go to Honda?
|
|
|
|
Post by mtmade1964 on Aug 7, 2007 11:59:53 GMT -5
Oh yeah, when the variator went flying down the road, my belt got wedged beween the clutch and housing, I mean WEDGED. Two guys pushing/pulling could not turn it loose. Any suggestions on this situation would be appreciated. At this point Elaine is just sitting and that is not good for either of us.
|
|
|
|
Post by Dandy Dan on Aug 7, 2007 12:24:47 GMT -5
So where you riding it with the drive cover off? Losing those Daytona sliders really sucks because they are not the same as the stock ones. I'm not sure what you can do short of buying a new one. You could try widdling the stock ones to fit the Daytona? It's possible these sliders just collected under your clutch so you'll find them once you get the belt out.
About the kickstarter washer, yeah you'll need to pick one up from your local Honda dealer but it should only be a few bucks. I wouldn't worry about this too much.
About getting the belt un-wedged...hmm...if it's wedged under the clutch bell then can you turn the clutch bell with a 14mm wrench/socket and pull it out as this turns? If it's wedged under the edges of the ramp plates then these should spin as you roll the scooter so maybe try that while you try to guide the belt out. You could also try removing the 14mm nut holding the clutch on and maybe you loosening the clutch or sliding it over you can free the belt.
|
|
|
|
Post by mtmade1964 on Aug 7, 2007 16:25:33 GMT -5
Yeah cover was off. I figured I'd be playing with it more than once to get weights and spring right. Pffft. Like I said, about 15'. I figured I could get the washer at Honda, sucks the nearest one is about 40 miles from here. Oh well, needed to go anyway. Just sux. First time I tinker with it. Well, now she is just gonna go to the shop early and sit until I get all the new parts. what a bummer man...... Oh yeah, The belt is wedged under the ramp plates and the wheel has drag but will not turn the pulley.
|
|