|
|
Post by andr01dm on May 17, 2009 19:20:10 GMT -5
The new shims arrived and, with those installed, the clearance for the intake and outlet valves are now perfect.
jc250r31: I believe the intake was a zero clearance because I've replaced the cylinder head and both valves as well, but was still using the shims from the original cylinder head and valves. In hind sight that was probably not a great idea.
So I put everything back together and ran the engine. Did a compression test after getting it warmed up. It's still 60 PSI. Changing the shims had no effect at all on the compression.
It was worthwhile to fix it, and I'm glad I did it, but I wish it had been the problem.
C'est la vie.
smartbomb: I'm pretty sure that it is a problem with the rings and perhaps the piston. They have been in and out of the engine several times and each time I've had to clean a glaze of soot, oil and coolant off of them. I suspect that they've been damaged.
|
|
shawna
Junior Ruckster

Posts: 58
|
Post by shawna on May 17, 2009 21:22:00 GMT -5
The new shims arrived and, with those installed, the clearance for the intake and outlet valves are now perfect. jc250r31: I believe the intake was a zero clearance because I've replaced the cylinder head and both valves as well, but was still using the shims from the original cylinder head and valves. In hind sight that was probably not a great idea. So I put everything back together and ran the engine. Did a compression test after getting it warmed up. It's still 60 PSI. Changing the shims had no effect at all on the compression. It was worthwhile to fix it, and I'm glad I did it, but I wish it had been the problem. C'est la vie. smartbomb: I'm pretty sure that it is a problem with the rings and perhaps the piston. They have been in and out of the engine several times and each time I've had to clean a glaze of soot, oil and coolant off of them. I suspect that they've been damaged. Im telling you that your valves are not machined to match the valve seats and that is why you are losing compression. How many times do I have to tell you this??????? |
|
|
|
Post by jc250r31 on May 17, 2009 23:50:41 GMT -5
Im telling you that your valves are not machined to match the valve seats and that is why you are losing compression. How many times do I have to tell you this??????? If he changed the head and the valves at the same time then I would highly doubt that the seats would be the problem. This would only apply to buying a new head and valve from Honda straight out of the box. Not getting a "used" head from someone else. |
|
shawna
Junior Ruckster
Posts: 58
|
Post by shawna on May 19, 2009 11:31:41 GMT -5
Im telling you that your valves are not machined to match the valve seats and that is why you are losing compression. How many times do I have to tell you this??????? If he changed the head and the valves at the same time then I would highly doubt that the seats would be the problem. This would only apply to buying a new head and valve from Honda straight out of the box. Not getting a "used" head from someone else. I stripped the engine apart, replaced the valves with new ones, checked the piston rings and they seemed okay. He clearly states that he bought new valves while using his old head. Those news valves will not be machined or ground to match his old cylinder head. Even badly worn out piston rings will give you more than 60psi of compression. Remember he has no rings and he has his cylinder machined. So I highly doubt there is a problem here. Now this is a big statement in trust on his install abilities. The only other thing I can see is him not installing or gapping the piston rings correctly. But since he read the Ruckus manually and followed the procedures fairly closely. I am going to trust him on correct installation of the piston rings. Get a leakdown test done and you will know for sure...But my money is still on valves not being seated with the valve seats |
|
|
|
Post by jc250r31 on May 20, 2009 23:30:57 GMT -5
The new shims arrived and, with those installed, the clearance for the intake and outlet valves are now perfect. I believe the intake was a zero clearance because I've replaced the cylinder head and both valves as well, but was still using the shims from the original cylinder head and valves. In hind sight that was probably not a great idea. |
|
|
|
Post by smartbomb on May 22, 2009 23:17:16 GMT -5
Were the valves lapped when installed?
|
|
shawna
Junior Ruckster
Posts: 58
|
Post by shawna on May 23, 2009 8:32:01 GMT -5
The new shims arrived and, with those installed, the clearance for the intake and outlet valves are now perfect. I believe the intake was a zero clearance because I've replaced the cylinder head and both valves as well, but was still using the shims from the original cylinder head and valves. In hind sight that was probably not a great idea. Do you even read any of the posts besides your own????????? The new shims arrived and, with those installed, the clearance for the intake and outlet valves are now perfect. jc250r31: I believe the intake was a zero clearance because I've replaced the cylinder head and both valves as well, but was still using the shims from the original cylinder head and valves. In hind sight that was probably not a great idea. So I put everything back together and ran the engine. Did a compression test after getting it warmed up. It's still 60 PSI. Changing the shims had no effect at all on the compression. It was worthwhile to fix it, and I'm glad I did it, but I wish it had been the problem. C'est la vie. smartbomb: I'm pretty sure that it is a problem with the rings and perhaps the piston. They have been in and out of the engine several times and each time I've had to clean a glaze of soot, oil and coolant off of them. I suspect that they've been damaged. Were the valves lapped when installed? I have been saying and asking this for the longest time, but for some reason people think I have no idea what I am talking about... |
|
|
|
Post by jc250r31 on May 23, 2009 22:08:47 GMT -5
Obviously I must not because when you quoted me in that post, to which I quoted it states that he changed "the cylinder head and both valves as well".
Where are you reading that he did not change the cylinder head? I apparently missed his statement.
|
|
shawna
Junior Ruckster
Posts: 58
|
Post by shawna on May 24, 2009 9:59:52 GMT -5
Obviously I must not because when you quoted me in that post, to which I quoted it states that he changed "the cylinder head and both valves as well". Where are you reading that he did not change the cylinder head? I apparently missed his statement. He doesn't state that he is using a new cylinder head. He said he replaced the cylinder head. Is it used one? He states that he replaced the valves with new valves. If he bought a new head from and Honda and his cylinder head and valves do not come from Honda assembled or if he is using a used head with new valves. The valve seat on the cylinder head and valves will not be ground to match. Its that simple. The only other area I can see that is the problem is that he assembled the piston rings wrong and get getting massive blow by. But like I said in my previous post. I will give him the benefit of doubt and trust him that he did it right. But after re reading this thread. I really do wonder on his mechanical abilities and knowledge. I have rebuilt many engines and have plenty experience in this area. I am actually quite shocked to read that Chanito is telling him that its valve clearance was the likely problem. |
|
|
|
Post by scooterbill on May 25, 2009 20:24:50 GMT -5
andr01dm,
I am not an expert on engine rebuilding, but here are some things to check or do.
Things that need to be done.
1. Anytime you change a head and valves, the valves need to be lapped.
2. The valve clearenced checked.
3. Anytime a head is taken off, you need to use a new head gasket.
4. Is the timing right?
5. Has the head and block been decked and smoothed flat on a surface plate?
6. Head bolts torqued to the right specification.
7. Are the piston rings installed the right way?
From your last post you say you have to clean soot, oil and coolant off the pistons and rings.
You have a leaking head gasket. It maybe caused by a warped head (over heated), not a smooth head or block mating surface, reused head gasket.
The oil could be caused by to loose of valve stem clearence or no valve stem gaskets.
The soot could be from being too rich.
I think you should take the head off and check that the block was machined right, everything is put together correctly and that the head and block surfaces are smooth, timing is right, valves lapped and rings installed correctly. Then put it back together using a torque wrench and a new head gasket.
|
|
|
|
Post by chanito on May 26, 2009 9:53:23 GMT -5
[glow=red,2,300]"I have rebuilt many engines and have plenty experience in this area. I am actually quite shocked to read that Chanito is telling him that its valve clearance was the likely problem". [/glow] Thanks for the info Shawna, but if he has installed new valves in a new head without setting valve clearances, that would be my first place to look in a low compression problem  Lapping valves on new valves on new head should not be that important as they are freshly machined, i would do it because that is the proper way, but it is more critical on used valves with burnt surfaces And mostly thanks for your input as we always need more tech savvy people here ;D  I do make mistakes, and if i am wrong i apreciate people telling me so, as that is the best way to learn, but i think that that, was still his first mistake. ALWAYS CHECK VALVE CLEARANCES when to take a head apart, even if you have not replaced parts, but more so if you have |
|
shawna
Junior Ruckster
Posts: 58
|
Post by shawna on May 26, 2009 11:00:20 GMT -5
[glow=red,2,300]"I have rebuilt many engines and have plenty experience in this area. I am actually quite shocked to read that Chanito is telling him that its valve clearance was the likely problem". [/glow] Thanks for the info Shawna, but if he has installed new valves in a new head without setting valve clearances, that would be my first place to look in a low compression problem Lapping valves on new valves on new head should not be that important as they are freshly machined, i would do it because that is the proper way, but it is more critical on used valves with burnt surfaces And mostly thanks for your input as we always need more tech savvy people here ;D I do make mistakes, and if i am wrong i apreciate people telling me so, as that is the best way to learn, but i think that that, was still his first mistake. ALWAYS CHECK VALVE CLEARANCES when to take a head apart, even if you have not replaced parts, but more so if you have Hey Chanito, I do not doubt your mechanical knowledge. You have decades of life experience with motors. I am glad you clarified that you stated checking valve clearances should be a first step in this diagnosing. That is why I was shocked when Androm wrote that you told him it was the likely problem vs check it first to eliminate that as a problem.. This is what I have found when assembling heads no matter new head/new valves, used head/new valves. If the 2 come seperate from each other. Get them machined to match because 2 different places machining the surfaces may not have thier grinding stones where it should be. 1 machiner may be using a stone in which he thinks 45. when in fact its 46 or whatever. When ever I install valves on a head. I always perform a quick vacuum test on the valves to check for leakage. If cant do a vaccum test. I will shoot air on the back side of the valves and check with water on the other of the valve for air bubbles in the water. If I were the OP. I would buy a stock engine and put it back in and call it a day or pay someone to perform the BB mod with tuning. This is project clearly out of his comfort zone. A great learning experience yes. But not something that he can do on his own. |
|
|
|
Post by andr01dm on Jun 6, 2009 12:58:07 GMT -5
I bought a leak down tester from Napa and a small compressor from Home Depot. A bit expensive but it proved to be a useful test: There's no leaking from either the inlet or the outlet, and the head gasket is leak free, but there is a lot of air coming out of the crankcase itself. This indicates that it's the piston and/or rings that are the source of the leak. Or perhaps the bore diameter if the shop I had it done at screwed up.. but I doubt that since they are quite well respected when it comes to doing big bore work on engines. If I were the OP. I would buy a stock engine and put it back in and call it a day or pay someone to perform the BB mod with tuning. This is project clearly out of his comfort zone. A great learning experience yes. But not something that he can do on his own. Hi Shawna. :) Thank for your advice, and I am considering all of these options. I have been since the first time I started having problems with doing a big bore. If I were doing this all over again, I think I'd just buy a bike with a bigger engine to begin with. A little 50cc, 4 stroke engine just doesn't have enough power to keep up with the OMG-I-have-to-get-there- now traffic in Toronto. I have also been window shopping, looking at pre-loved 250cc scooters, and I'm considering getting one. Though the fear of buying someone else's problem bike is putting me off. I will give rebuilding my engine one more try, once Chanito has more pistons & rings available for sale. If I stop now I'll end up feeling like I gave up too soon and wasted all of the money and work that I've invested into it so far. And I think I've nearly got it. |
|
shawna
Junior Ruckster
Posts: 58
|
Post by shawna on Jun 6, 2009 22:29:26 GMT -5
I bought a leak down tester from Napa and a small compressor from Home Depot. A bit expensive but it proved to be a useful test: There's no leaking from either the inlet or the outlet, and the head gasket is leak free, but there is a lot of air coming out of the crankcase itself. This indicates that it's the piston and/or rings that are the source of the leak. Or perhaps the bore diameter if the shop I had it done at screwed up.. but I doubt that since they are quite well respected when it comes to doing big bore work on engines. If I were the OP. I would buy a stock engine and put it back in and call it a day or pay someone to perform the BB mod with tuning. This is project clearly out of his comfort zone. A great learning experience yes. But not something that he can do on his own. Hi Shawna. :) Thank for your advice, and I am considering all of these options. I have been since the first time I started having problems with doing a big bore. If I were doing this all over again, I think I'd just buy a bike with a bigger engine to begin with. A little 50cc, 4 stroke engine just doesn't have enough power to keep up with the OMG-I-have-to-get-there- now traffic in Toronto. I have also been window shopping, looking at pre-loved 250cc scooters, and I'm considering getting one. Though the fear of buying someone else's problem bike is putting me off. I will give rebuilding my engine one more try, once Chanito has more pistons & rings available for sale. If I stop now I'll end up feeling like I gave up too soon and wasted all of the money and work that I've invested into it so far. And I think I've nearly got it. Did you install the pistons rings correctly???? Arghhhhhh !!! I even said in my previous post that I would give you the benefit of doubt that you did and I based my posts thinking you did ........ |
|
|
|
Post by andr01dm on Jun 27, 2009 16:32:47 GMT -5
H'lo again. Sorry for the long idle.. busy with non-Ruckus life while waiting for parts to arrive. Did you install the pistons rings correctly???? I think that I did. However........ My new piston and rings arrived this week, thank you Chanito! I've been going through tearing the engine down and rebuilding again and I've reached the stage where I put the rings onto the piston. However the illustrations of the rings in the Ruckus manual and in the Wisco guide that came with the piston do not match the rings. So.. how does one determine which ring goes on top and which goes in the middle? (The scraper rings are a no-brainer.) Here's what the Honda manual has: 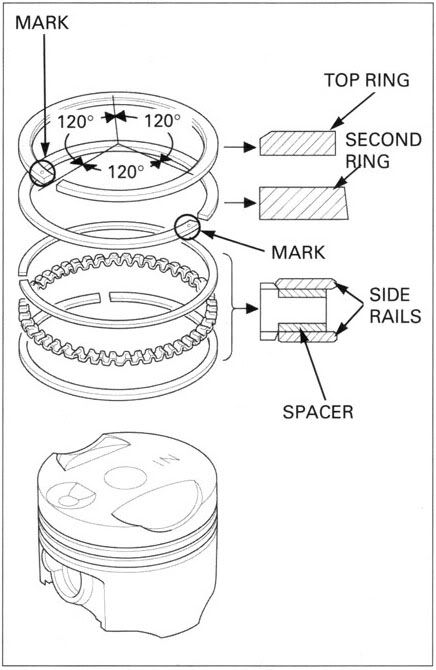 And here's the Wiseco instructions: 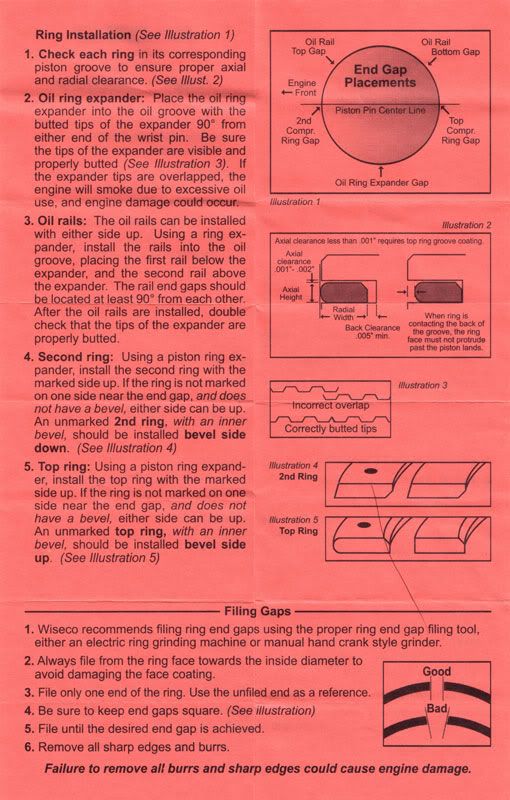 And here's an illustration I made of the actual rings: 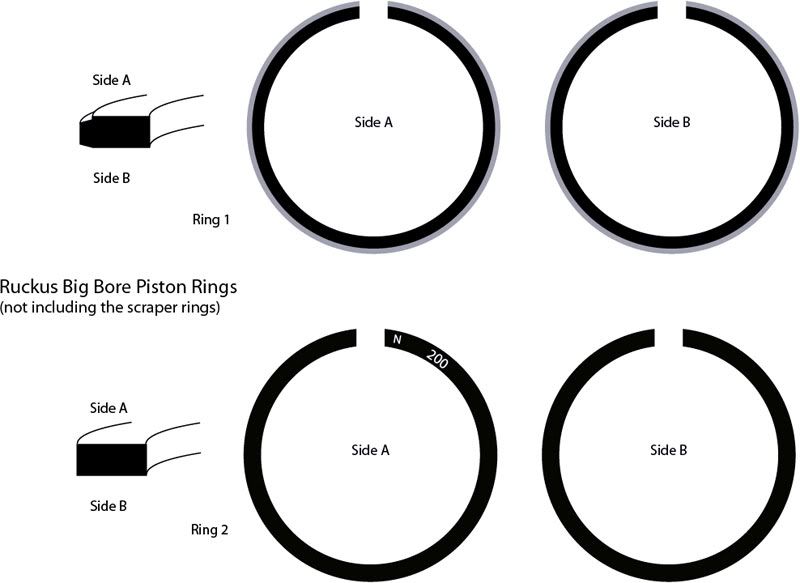 Is there any chance someone can clarify for me which ring is the top and which goes in the middle.. and which side on each goes up? Thank you. ^_^ |
|
|
|
Post by pounder on Jun 27, 2009 19:43:43 GMT -5
hey andr01d..I just did the BB this week and have 0 problems..gt mine done at gords also..
the ring with the curved side is at the top of the piston..the flat one is the second from the piston (or middle ring)..also there is no taper on the back side so it doesn't matter what side is up..
|
|
|
|
Post by andr01dm on Jun 28, 2009 8:44:39 GMT -5
hey andr01d..I just did the BB this week and have 0 problems..gt mine done at gords also.. the ring with the curved side is at the top of the piston..the flat one is the second from the piston (or middle ring)..also there is no taper on the back side so it doesn't matter what side is up.. Hi Pounder. :) Glad to hear your big bore went well, and that Gord's bore job was not an issue.. mine shouldn't be... *knock on wood* When you say the "curved side" you mean the one with the angled edges on the outer rim? Doesn't the little shelf on the outer edge matter for which side of the ring goes up? Here's a closeup of what my ring looks like: 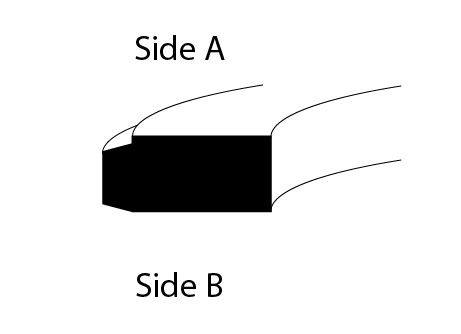 It has that little shelf on the inside of one of the angled cuts. If the ring isn't supposed to have that.. if it's just supposed to be two angles and no shelf.. maybe it wasn't manufactured correctly..? |
|
|
|
Post by chanito on Jun 28, 2009 9:07:15 GMT -5
Ring number one is the top ring, and is suppose to have the bevel up to decrease the amount of ring wall therefore increasing the pressure to prevent the piston from rocking, the step is normal, it should not matter which way is up, but i always install it with the step towards the bottom so the surface touching the cylinder will be further up helping with the piston rocking; ring number two is the middle ring and i put it with the marks toward the top of the piston as is suppose to have a taper in the back so the gases will push the ring toward the cylinder preventing oil consumption
|
|
|
|
Post by andr01dm on Jun 28, 2009 9:24:52 GMT -5
Ring number one is the top ring, and is suppose to have the bevel up to decrease the amount of ring wall therefore increasing the pressure to prevent the piston from rocking, the step is normal, it should not matter which way is up, but i always install it with the step towards the bottom so the surface touching the cylinder will be further up helping with the piston rocking; ring number two is the middle ring and i put it with the marks toward the top of the piston as is suppose to have a taper in the back so the gases will push the ring toward the cylinder preventing oil consumption Thank you! :) |
|
|
|
Post by pounder on Jun 28, 2009 19:34:27 GMT -5
my rings seriously didn't look like that..it was perfectly rounded all the way with no step in it (if you look at the top ring in your pink sheet that is what mine looks like without the bevel on the back side of the ring)..it was the last batch of BB kits though so maybe they changed the rings?? no clue..
and gord's job was top notch..and yeah I too seriously doubt it was the boring..I wish I could help with some suggestions to help you but if you ever tear it down again and want to drive 4 hours north to North Bay then I can give you a hand ;D
|
|


