Post by Dandy Dan on Nov 2, 2006 15:10:13 GMT -5
This install is for installing any combination of final drive (transmission) gears from the Honda Metropolitan (aka Jazz in Canada) in your Ruckus or if you want to rebuild your transmission cuz it's leaking or you need new thrust washers.
Required Tools:
- 8mm, 10mm, 12mm and 14mm sockets/wrenches
- Variator Tool OR Impact Gun OR Strapwrench
- Funnel
Required Supplies:
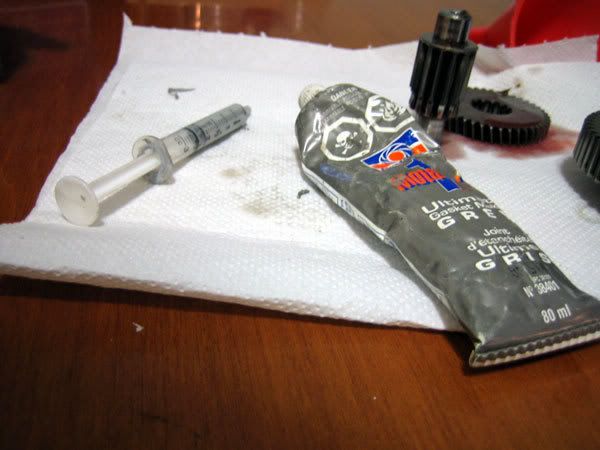
- Sealant (and a syringe is a good idea to help you apply it)
- Degreaser (ie. brake cleaner) to clean the mating surfaces
- Paper Towels/Rags (to clean up your gear oil mess)
- Scuff pad (or equivilent) to remove old sealant
- New thrust washers
- Any gears you plan on installing
- Hypoid SAE 90 Gear Oil
Preliminary Steps:
This install guide begins assuming you have removed your exhaust, rear wheel and drive case cover. To remove your exhaust there are two 10mm bolts under the engine and two 12mm bolts behind the radiator plus one 10mm bolt attached to the fender. Also don't lose the seal. To remove the rear wheel you need a 22mm socket or wrench. Hold the rear brake to keep the wheel still while you loosen the nut. To remove the drive case cover there are six 8mm bolts and 10mm bolt
Step 1 - Drain Gear Oil
The Ruckus uses 100ml of gear oil which should be drained before disassembly. To drain it go for a 10+ minute ride to warm it up. Then remove the 12mm bolt as identified in Step 3. It's difficult to drain all of the gear oil because it's thick and the hole is intended for refilling, not draining, but by tipping the scooter over you can get about 80% of it. You can skip this step if you want but things will be a bit messy later.
Step 2 - Remove the Clutch
There are 2 bolts that you'll need to remove later (they hold the transmission case on), that are located behind the clutch so you'll need to remove the clutch to get at them. Prevent the clutch from spinning (with your variator tool or strap wrench) as you loosen the nut unless you are using an impact gun. If you are using an impact gun it's better to remove this clutch nut before you remove the rear wheel so there's more resistance.
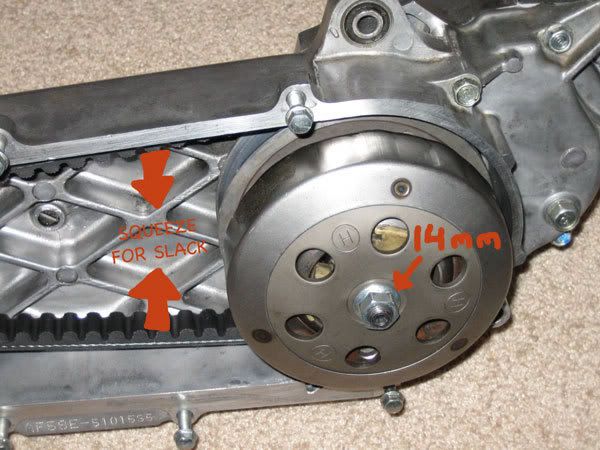
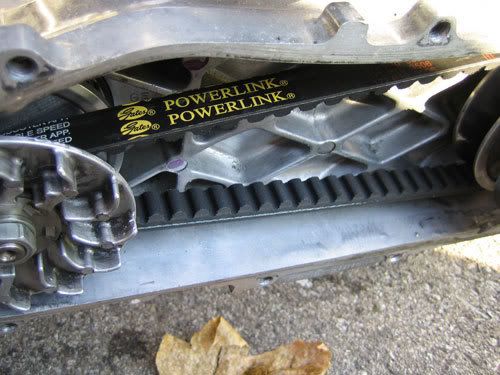
The clutch bell and clutch will just slide off the shaft once the nut is removed but you will need to create some slack in the belt as shown above.
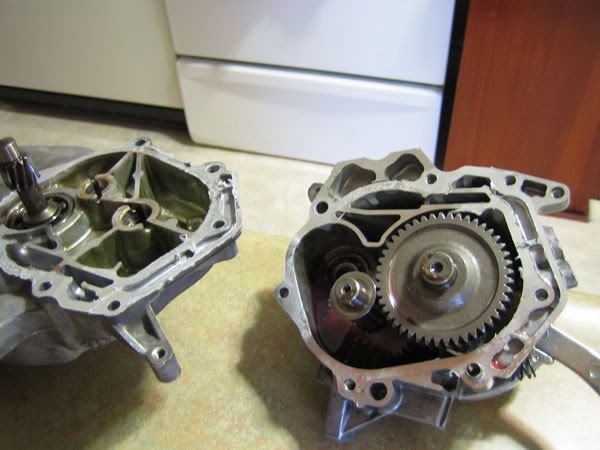
Step 3 - Remove the Transmission Case
There are 7 bolts that hold the transmission case on as identified below. The drain bolt does not need to be removed. Remove the seven blue/green 10mm bolts.

Now you should be able to wiggle the case off. There are 2 pins that will still be present, one of which is identified below.
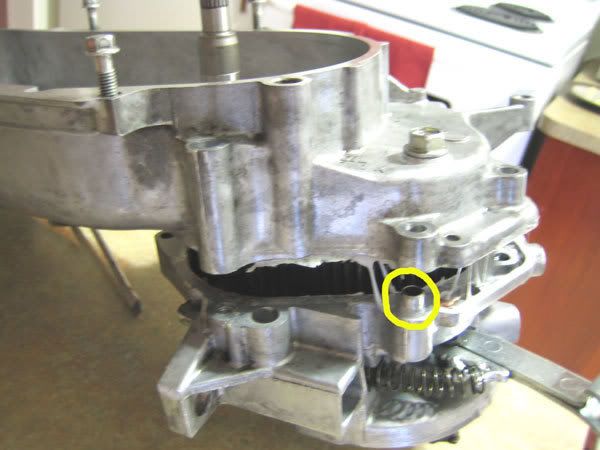
Step 4 - Remove Gears and Clean
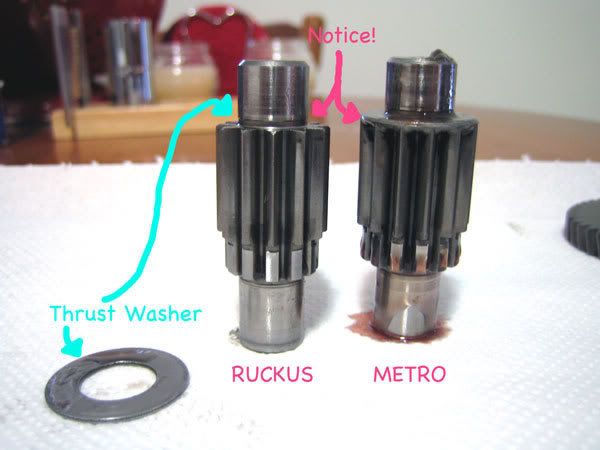
Once you remove the case the gears shown below should be in it unless they haven fallen out. Notice where everything goes before you proceed. The 2 'thrust washers' have different inner diameters so they can't be confused when reinstalling them. There is a 3rd plastic washer that is also identified below. In total you should have 3 gears and 3 washers.
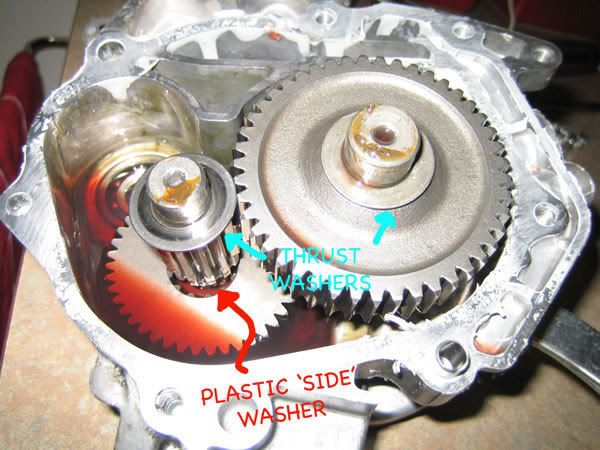
Notice that the drive shaft that the clutch was formerly mounted on remains with the main drive case.
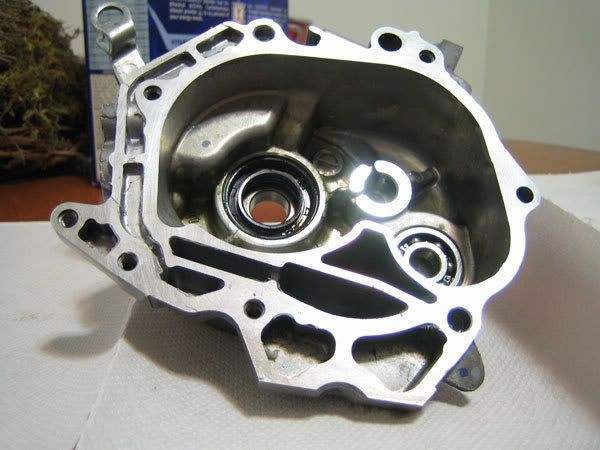
Once you understand how the gears and washer fit together, lift them out and clean the case. You want to clean off the mating surfaces and degrease them so you can reseal it properly. It's also a good idea to wash or wipe out the remaining gear oil in the case because you don't want gear oil running over your sealant as you try to mate the 2 halves later.
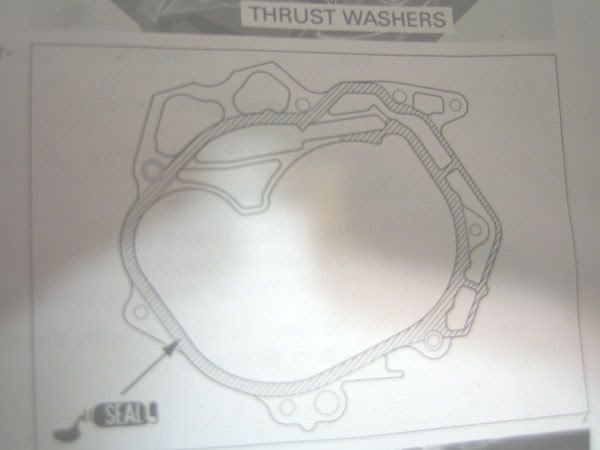
Step 5 - Reseal and Reassemble
Next, apply your sealant to the case as shown in the diagram (from the service manual). Ensure surfaces are clean and oil free before proceeding.
Follow the directions on your sealant if it asks you to wait a minute or two before mating the halves. A great way to apply the sealant is with a syringe as shown below (Thanks Chanito ;D).
Now drop the gears back in. I like to do it after I've applied the sealant as it's easier apply the sealant without them in but it can be done either way. Put the gears in making sure you have the plastic washer and 2 thrust washers located correctly. It's a good idea to use new ones as these are cheap and worn washers add slop/noise to your transmission.
At this point, you can drop in your Metro gears if you are changing your gearing. You have the option of replacing all three gears with the Metro ones for about a 13% increase in your top gear ratio or you can just replace the last 47 tooth gear (rear axle) with the Metro 45T one for about a 4.5% increase in your gearing. If you do all the gears you may have issues with one of the thrust washers as I'll discuss later. The service manual also recommends putting a little grease in the holes the gears fit in which I believe is to avoid wear until the gear oil can fully coat everything. You can see this grease present in the first picture in Step 4.
Once your gears are back in and your sealant is applied, mate the 2 halves and bolt them back together securely keeping in mind where the long bolts go as shown in Step 3. Then you can bolt your clutch, rear wheel and exhaust back on. The torque spec for the rear wheel is 118 ft/lbs I believe. I'll post the other specs shortly.
Step 6 - Refill the Gear Oil
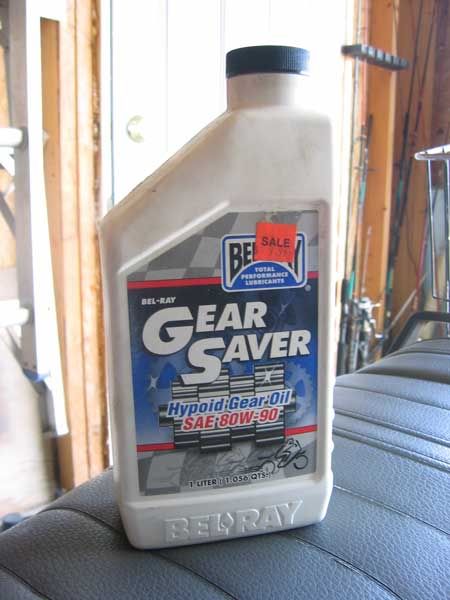
Using the correct gear oil as shown below, put 100ml in to the drive case. You will need a good funnel to do this or you can use a turkey baster or something. It helps if you tip the scooter over somewhat.
If you find you are spilling a lot and you aren't sure how much is going in then just over fill it and set the scooter on level ground with the drain bolt out and let it drip until it stops. The correct oil level is flush with the bottom of the bolt hole so overfilling it and letting it drip is an easy but messy way to get it right. Once you've got it filled properly, screw the 12mm bolt back in and you're done ;D
Required Tools:
- 8mm, 10mm, 12mm and 14mm sockets/wrenches
- Variator Tool OR Impact Gun OR Strapwrench
- Funnel
Required Supplies:
- Sealant (and a syringe is a good idea to help you apply it)
- Degreaser (ie. brake cleaner) to clean the mating surfaces
- Paper Towels/Rags (to clean up your gear oil mess)
- Scuff pad (or equivilent) to remove old sealant
- New thrust washers
- Any gears you plan on installing
- Hypoid SAE 90 Gear Oil
Preliminary Steps:
This install guide begins assuming you have removed your exhaust, rear wheel and drive case cover. To remove your exhaust there are two 10mm bolts under the engine and two 12mm bolts behind the radiator plus one 10mm bolt attached to the fender. Also don't lose the seal. To remove the rear wheel you need a 22mm socket or wrench. Hold the rear brake to keep the wheel still while you loosen the nut. To remove the drive case cover there are six 8mm bolts and 10mm bolt
Step 1 - Drain Gear Oil
The Ruckus uses 100ml of gear oil which should be drained before disassembly. To drain it go for a 10+ minute ride to warm it up. Then remove the 12mm bolt as identified in Step 3. It's difficult to drain all of the gear oil because it's thick and the hole is intended for refilling, not draining, but by tipping the scooter over you can get about 80% of it. You can skip this step if you want but things will be a bit messy later.
Step 2 - Remove the Clutch
There are 2 bolts that you'll need to remove later (they hold the transmission case on), that are located behind the clutch so you'll need to remove the clutch to get at them. Prevent the clutch from spinning (with your variator tool or strap wrench) as you loosen the nut unless you are using an impact gun. If you are using an impact gun it's better to remove this clutch nut before you remove the rear wheel so there's more resistance.
The clutch bell and clutch will just slide off the shaft once the nut is removed but you will need to create some slack in the belt as shown above.
Step 3 - Remove the Transmission Case
There are 7 bolts that hold the transmission case on as identified below. The drain bolt does not need to be removed. Remove the seven blue/green 10mm bolts.
Now you should be able to wiggle the case off. There are 2 pins that will still be present, one of which is identified below.
Step 4 - Remove Gears and Clean
Once you remove the case the gears shown below should be in it unless they haven fallen out. Notice where everything goes before you proceed. The 2 'thrust washers' have different inner diameters so they can't be confused when reinstalling them. There is a 3rd plastic washer that is also identified below. In total you should have 3 gears and 3 washers.
Notice that the drive shaft that the clutch was formerly mounted on remains with the main drive case.
Once you understand how the gears and washer fit together, lift them out and clean the case. You want to clean off the mating surfaces and degrease them so you can reseal it properly. It's also a good idea to wash or wipe out the remaining gear oil in the case because you don't want gear oil running over your sealant as you try to mate the 2 halves later.
Step 5 - Reseal and Reassemble
Next, apply your sealant to the case as shown in the diagram (from the service manual). Ensure surfaces are clean and oil free before proceeding.
Follow the directions on your sealant if it asks you to wait a minute or two before mating the halves. A great way to apply the sealant is with a syringe as shown below (Thanks Chanito ;D).
Now drop the gears back in. I like to do it after I've applied the sealant as it's easier apply the sealant without them in but it can be done either way. Put the gears in making sure you have the plastic washer and 2 thrust washers located correctly. It's a good idea to use new ones as these are cheap and worn washers add slop/noise to your transmission.
At this point, you can drop in your Metro gears if you are changing your gearing. You have the option of replacing all three gears with the Metro ones for about a 13% increase in your top gear ratio or you can just replace the last 47 tooth gear (rear axle) with the Metro 45T one for about a 4.5% increase in your gearing. If you do all the gears you may have issues with one of the thrust washers as I'll discuss later. The service manual also recommends putting a little grease in the holes the gears fit in which I believe is to avoid wear until the gear oil can fully coat everything. You can see this grease present in the first picture in Step 4.
Once your gears are back in and your sealant is applied, mate the 2 halves and bolt them back together securely keeping in mind where the long bolts go as shown in Step 3. Then you can bolt your clutch, rear wheel and exhaust back on. The torque spec for the rear wheel is 118 ft/lbs I believe. I'll post the other specs shortly.
Step 6 - Refill the Gear Oil
Using the correct gear oil as shown below, put 100ml in to the drive case. You will need a good funnel to do this or you can use a turkey baster or something. It helps if you tip the scooter over somewhat.
If you find you are spilling a lot and you aren't sure how much is going in then just over fill it and set the scooter on level ground with the drain bolt out and let it drip until it stops. The correct oil level is flush with the bottom of the bolt hole so overfilling it and letting it drip is an easy but messy way to get it right. Once you've got it filled properly, screw the 12mm bolt back in and you're done ;D


 Maybe some before and after graphs?


 Next mod is installing a metro final gear, i already cut some slits in the variator case for cooling and the drive train noise have increase dramatically, but i am hoping that by allowing a cooler case the belt will last longer