Another important maintenance procedure people may want to do while their tranny is apart is replacing the rear axle bearing. This part isn't known to fail (I've never heard of it) but several people have complained of excessive rear wheel slop which may be cased in full or partly but a sloppy axle bearing. If you are experiencing this problem it's also a good idea to replace your transmission washers at the same time and also double check that you haven't forgotten to use the washer in between the rear rim and the nut that holds it on. As well, it's fairly common for our rims to becomes slightly bent so if you notice a wobble while revving it up on the stand that may be your culprit.
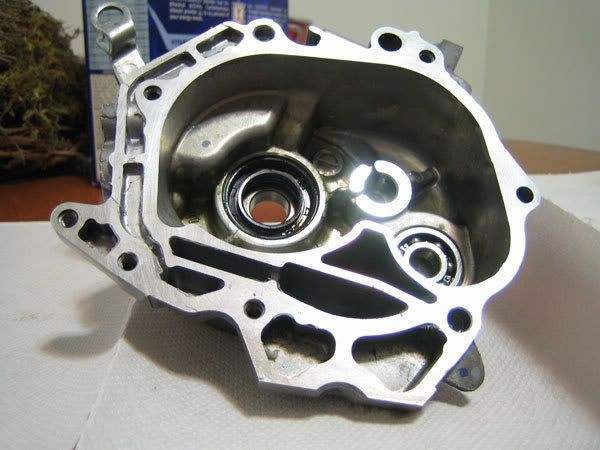
Anyways, the rear axle bearing can be somewhat seen in the below pic although it's most obsecured by the oil seal which you'll also want to replace at the same time.
Fortunately, replacing these parts is relatively simply once you've already got the transmission disassembled. What you need to do is hammer the bearing from the rim side of the tranmission
Icase so that the bearing is pressed inwards until it's out of it's recession. If you want you can remove the oil seal with a pair of pliers before you remove the bearing but if you just leave it the bearing will obviously push it out. When you tap the bearing out it's a good idea to use an appropriately sized socket so that you aren't hitting the case with your hammer and so the force is equally dispersed. Unfortunately I can't tell you what size socket is the best because I replaced my bearing over a year ago. Although I'm sure it'll be difference for difference people, my bearing was in there quite tightly and thus required several good wacks to get it out.
Now once you've got the bearing and oil seal out you'll want to get out your new bearing and hopefully new oil seal (don't be cheap...it's not worth doing the job twice). Which cost $15.52 and $5.35 respectfully from RonAyers.com so probably about $25 US total from your local dealer.
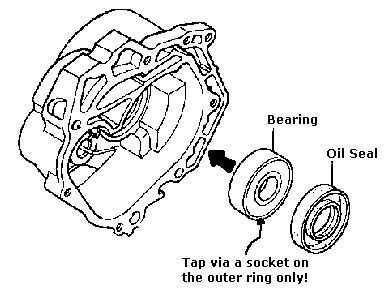
Ignore the oil seal for now and worry about pressing the bearing in. To get the new bearing in you'll want to carefully tap it in with a hammer from the opposite side you were hammering from before. It's a good idea to coat the surfaces with oil so things go a bit smoother. In order to tap it in without damaging the bearings you'll want to be sure ot use the appropriate sizes socket so that you hammering force is only recieved by the outer metal ring of the bearing. If you hit the inside of the bearing you'll damage it. If I recall correctly the correct socket is a 22mm socket but I'm not sure so use your head. There is also most likely an official Honda tool for removing and reinstalling this bearing but like most official Honda tools, it's likely overpriced and probably not necessary. As long as you aren't whailing on the new bearings with your hammer and as long as you're using the correct socket to disperse the force along the outer ring you should be fine.
Once you have the new bearing in all the way double check and make sure it's in all the way. Have a look from the other side (outside) of the tranny to make sure it's flush against the wall all the way around. In my experience, the new bearing hammers in easier than the old one hammers out. Next, you'll need to push the new oil seal in. To do this just give it a light coat of oil and push it in by hand. Then you're done and you can continue with the reassembly as described on page 1 of this thread.
Note: When you are removing the bearing you will have to hammer on the center of the bearing because the outer edges are covered. This is okay because you aren't going to reuse the bearing...just don't do this to the new bearing when you tap it in from the other side.


 I hit 45 and weight 225 lbs