Post by chanito on Apr 6, 2008 10:16:42 GMT -5
 OK, i have refuse to do this for a long time,
  But i think letting you guys doing it the wrong way is also a bad idea
 So some things first out of the way
1.- FORGET ABOUT ALL THOSE POSTERS THE SPARK PLUG COMPANIES KEEP POSTING, they are only good to diagnosis a problem, and should be used only if your lawn mower refuse to start after a long winter in the tool shed and you want to diagnosis it right. THEY HAVE NO PLACE ON TUNNING AN ENGINE
2.-The porcelain by itself is no indication of mixture rich or lean, so if the base ring is black, i do not care if the porcelain is white, YOU ARE RUNNING RICH
3.- You need to make sure the idle mixture is adjusted properly, so if you do not care to adjust it properly do not bother to read the spark plug
4.-Start with a new spark plug, a used spark plug is hard to read even for experts (which i am not)
5.-Invest in a good torque wrench and torque the spark plug to 108 in/lbs and "never ever lube the spark plug thread with oil" if you want to do it use anti-seize and lower your torque by 18 in/lbs
6.-Find a good piece of road where you can keep full throttle for long, the longest the easier will be to read the plug
7.-Get a good magnifying glass and do it in a well lit place, the tool the doctors use to check your ears is the best tool for the job
8.-Read and make sure you understand all the parts of this method, as reading spark plug is not that hard, but is not a simple task, as you usually have to look at more than one clue to get a right reading
9.-If you ask 10 engine builders for a spark plug reading, more than likely you will get 10 different answers, so i am posting mine, if you have another opinion post it here with an explanation and we can compare notes. But if you are going to say because i used once and it worked or i think it is this way or that or my friend who install hot rod parts on his Honda say so, i will
 . If you married a bisexual swimsuit model that brings home her girlfriends for you to share, it does not means you are a great lover, it just means you are lucky
 10.-Just approach this with an open mind and most things will make sense
OK lets get familiar with the parts of the spark plug we will be using as sources of information
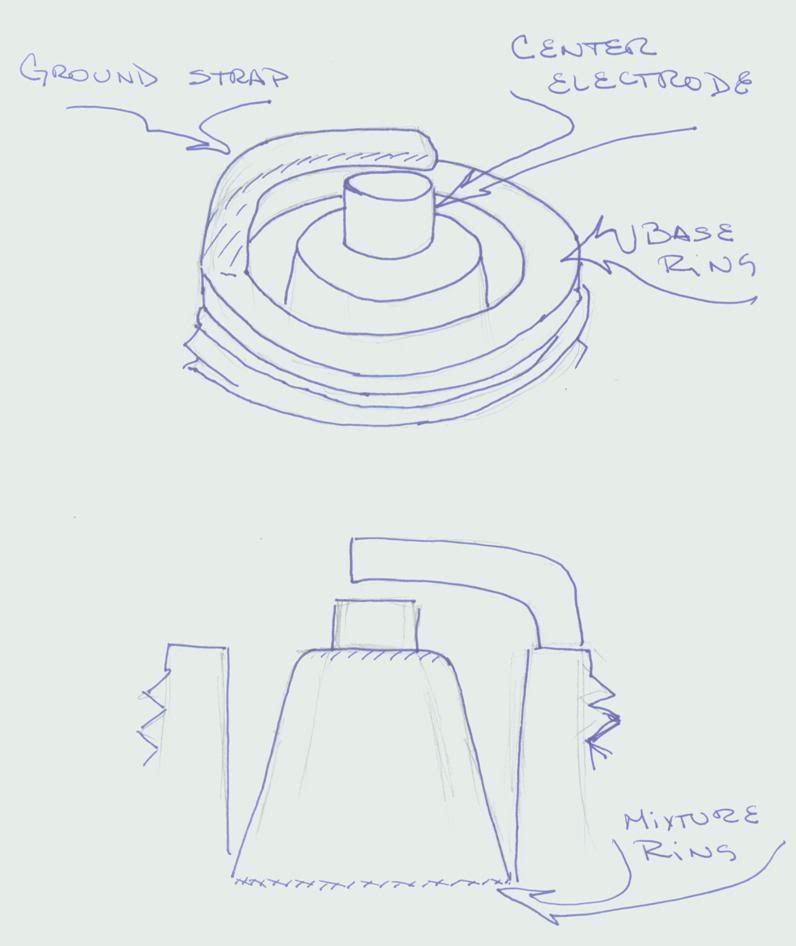
We will be using mostly the ground electrode (or strap) and the base ring (which is the part of the threaded part of the plug that is exposed to the combustion chamber), we will also read the center electrode and the mixture ring (if we are lucky) as they provide additional information and finally the ceramic part of the plug
The mixture ring is one of the most useful in determining the mixture, sadly in our case the plugs are so small i can not get a proper reading, just for your information i took a pic of a normal size plug next to ours to show you how small the plug is

I am posting info in case some of you are lucky and get the proper tool for the job and get to see it, anyway this is a pic of a used plug so you guys can see how it look like after some miles on it
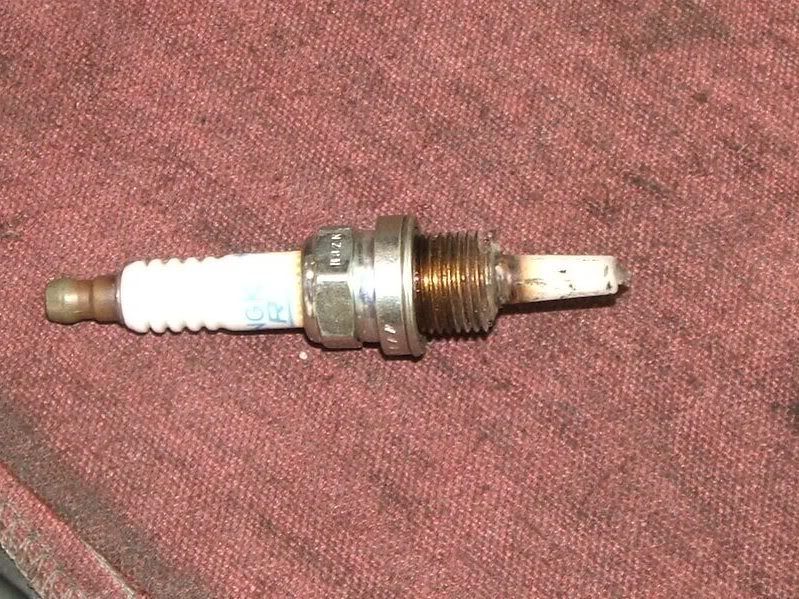
As you can see this a car spark plug and i cut the plug to show you what i am talking about
Now you need to get ready for this reading, so get a couple of new plugs, a small torque wrench and the right socket, a wrench for removing the plug, a good friend to help you be safe, a place where you can do your runs and please be careful, there is no need to endanger you or somebody else doing this, use common sense, set your mixture (it is the only carb system that provides gas ALL THE TIME, is just that at wide open throttle is percentage is so small it is almost non existent, but it affect the accel a lot and throttle response so do it before to prevent getting useless readings) if you decide to do 1/2 throttle runs (a good idea) it can be done the same day.
Warm your scooter good (at least 15-20 minutes of riding, no idling) then get your new spark plug and install it to the right torque (108 in/lbs) it is important as both a too tight a plug or too loose can alter the heat removing characteristic of the plug altering your readings
Start your scooter and immediately go for a full throttle run at the end of it just kill your engine and coast to a stop, remove your plug and get the magnifying glass and inspect the center electrode

You should have a sharp edge all the way around, with no pitting or rounding of the edge, as that will indicate a mechanical problem that should be addressed before continuing, At the top of the electrode you want a small area about the thickness of a sharpie line with a color different that the rest of the electrode (the shaded area on my drawing) that indicated the firing part of the electrode, if it is too wide the combustion is either too hot or too slow heating more area than it should (hi octane gas does that, it is not a good idea as it promotes missing at hi rpms)
If everything looks OK, then look at the ground strap, it also should be sharp with no pitting or rounding, the tip of the strap will also have a color change, you want it as close as the bend of the strap as posible, this will tell you about the timing of the spark, on my engine and most of the pictures people post of their ruckus spark plugs it is spot on (The Honda people did their job with the ECM), too advance a timing will put this closer to the base ring and too little advance will get it closer to the tip. Also we can use it to determine the heat range of the plug as too cold a plug will remove heat too quickly, which might allow later for the plug to collect deposits on its ground strap instead of burning them off (deposits on the ground strap promote preignition and uneven combustion)
Now lets look at the base ring, it should have a very light coat of soot at worst, but you want it greyist looking with some minor soot spots showing, if it is black, and i do not care if the porcelain is WHITE and you like it rich, your jetting is TOO RICH,
If you can get to see the mixture ring you want a line the size of a pencil line all the way around and the base ring grey, as that will normally produce the most power *but i just can not get to see the mixture ring on our plugs*

And if the base ring looks like new
 you are too lean
 and if it is shiny
 your engine is eating oil
 Now lets look at the porcelain, the area next to the center electrode should look smooth with no signs of ditching or change of texture as that will indicate an overheating problem, you want it to look as close as it got there as posible, shiny specs (look like someone shake pepper on it) are a sign of preignition or extremely lean condition (regular on a big bore engine does that) some gasolines have additives in it, that color the porcelain after a few miles you can use to determine the burn patern of your plug, as you want the color to be uniform all the way around.
Wow! that was long, if needed i will post more on this later

 nice post thanks, can't wait to read the rest.
 . Should I concentrate on a ghetto remedy to get more air in there?