Post by Dandy Dan on Nov 13, 2006 12:28:15 GMT -5
Properly replacing the stock airbox with some sort of an aftermarket filter requires attention to quite a few details. Otherwise you risk several problems like dirty air gumming up your carb, water getting into your engine oil, increasing your emissions and decreasing performance from turbulance airflow. This how-to is aimed at steering you clear of those problems. Before you read to far you should know that pre-2006 Rucks have different PCV and PAIR systems so you can take pointers from this how-to but you will need to pay extra attention to those areas. I'll begin this how-to by discussing the airsystems:
PCV SYSTEM (Postive Crankcase Ventilation):
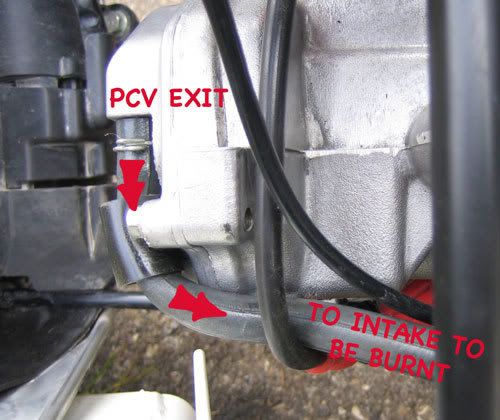
Honda radically updated the PCV system for 2006 on North American Ruckus's. They added a one way valve/solenoid to allow the air to enter the crankcase in a different spot from where it exits. Instead of the air entering/exiting simply from the hose at the top of the valve cover, it now just exits there and it enters through the modified cam chain tensioner via the valve as shown below.
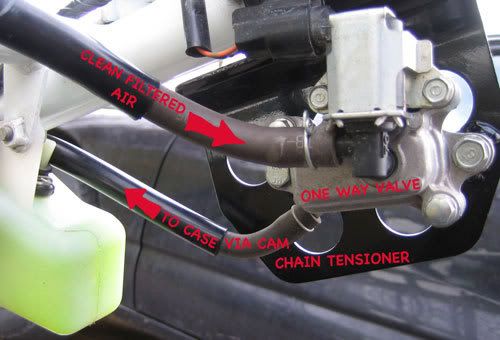
The goal of the PCV system is to remove blow by gas and oil vapours from the case and I believe it also elimates pressure spikes in the case. Compared to the oil system, this new system should keep our oil cleaner which hopefully reduces crankshaft bearing failure. The exit for the crankcase ventilation is at the top of our valve cover as shown below. You can let these gases vent to the atmosphere if you want but I strongly recommend against it because that increases your emissions a lot and contributes to smog. It's best to reuse the air exiting here and burn it to eliminate the vapours/fumes by connecting it to the main hose going to your carb and as close to the carb as possible so the vapours don't have time to condense. The three important things to remember pertaining to your PCV hoses are:
1 - Don't Allow Water In
2 - Make Sure the Intake is Getting Filtered Air
3 - Burn the Exit Gases (Please!)
PAIR SYSTEM
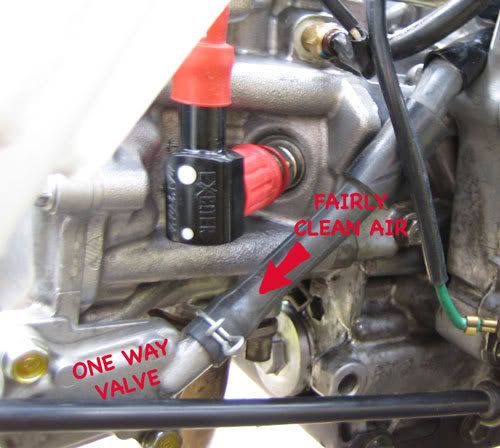
The PAIR system has actually been simplified for 2006. The goal of the PAIR system is to allow fresh air into the exhaust port to allow unburnt stuff to be burnt and thus reduce emissions. For 2006 you simply have a hose going to sort of a one way reed valve that leads to the exhaust port as shown below. Because this air is simply going into the exhaust port and isn't getting into the case or anything, it's not as important that the air is clean but you do want to ensure you aren't getting water in here because that would end up in your exhaust. You can eliminate this system altogether by removing the hose and plugging the valve but it's a good idea to keep it in use to save the trees. You can connect it to a source of filtered air if you want or even just chop the hose shorter as I've done and guide it to a sheltered spot under your carb so water doesn't fly in.
CARB BREATHER
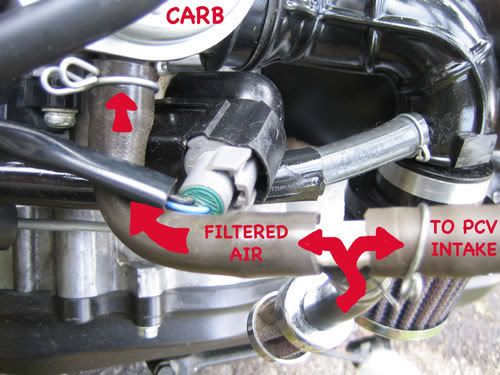
The carb breather hose attaches to the left side of the carb. The way the carb works using the air is complicated but essentially it uses pressure fluctuations to raise/lower the needle. It's essential that your carb breather is getting filtered air so it doesn't get gummed up. Make sure your crankcase (PCV) exit gases aren't able to go in here.
MAIN AIR SUPPLY
Lastly, we have our main air supply for the engine. This air needs to be filtered and smooth. By smooth, I mean you don't want your filter attached directly to the back of the carb because this means you don't have the tube to smooth out the turbulance and provide a reseviour of fresh air. Your main filter inner diameter needs to be 40-45mm if you put it directly on the carb (Bad) or 35mm if you are using the stock hose.
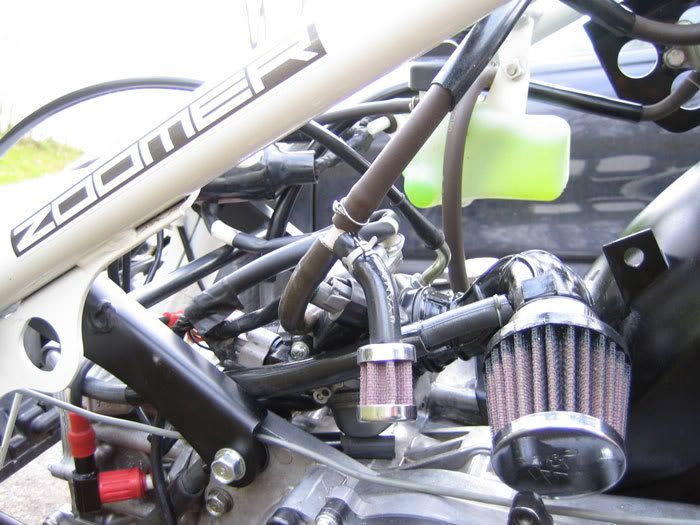
If you want you can use one main filter and connect hoses to that for supplies of clean air to your carb breather, PCV intake and even PAIR hose but if you do this then it's important to do this UPSTREAM of where you connect the PCV exit so that the quasi-dirty exit gases do not contaminate these systems. Alternatively, you can use one or more seperate, smaller filters for your PCV, PAIR (if you want) and Carb Breather hoses and only connect the PCV exit hose to the main intake hose. An important thing to keep in mind is that you want your filters aligned so that they angle downwards so that that water from washing your scoot or riding in the rain does not enter. I once had water enter past my main filter and run down the PCV exit hose into my case which badly contaminated my engine oil. Had I not realized this immediately I could have badly damaged my engine.
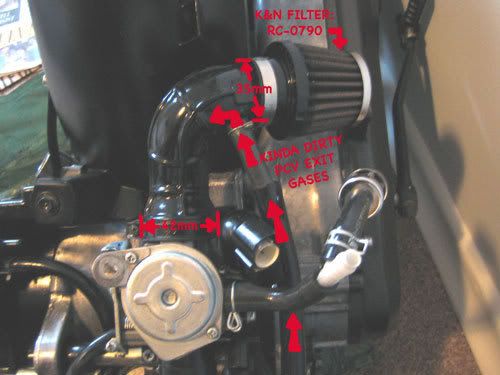
Here's a link to my K&N filter below but you can view other offerings at Battlescooter or www.importationsthibault.com. Just make sure it has a 35mm inner diameter.
www.knfilters.com/search/product.aspx?Prod=RC-0790
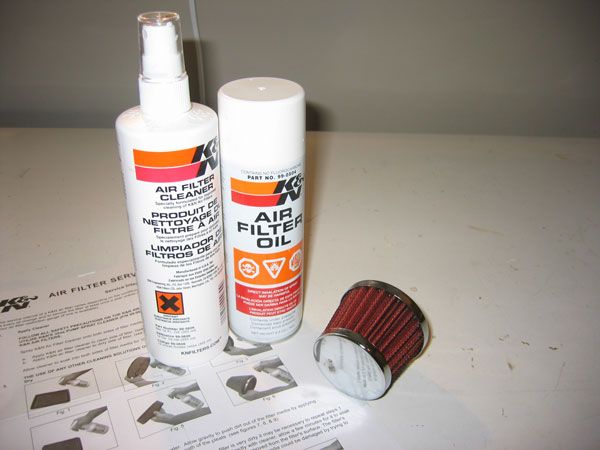
Below is the official KN cleaner kit shown with the 'Pod' filter from Battlescooter which is expensive but nice because it already has a nipple for your PCV exit hose and it includes the small filter shown through out this how to.
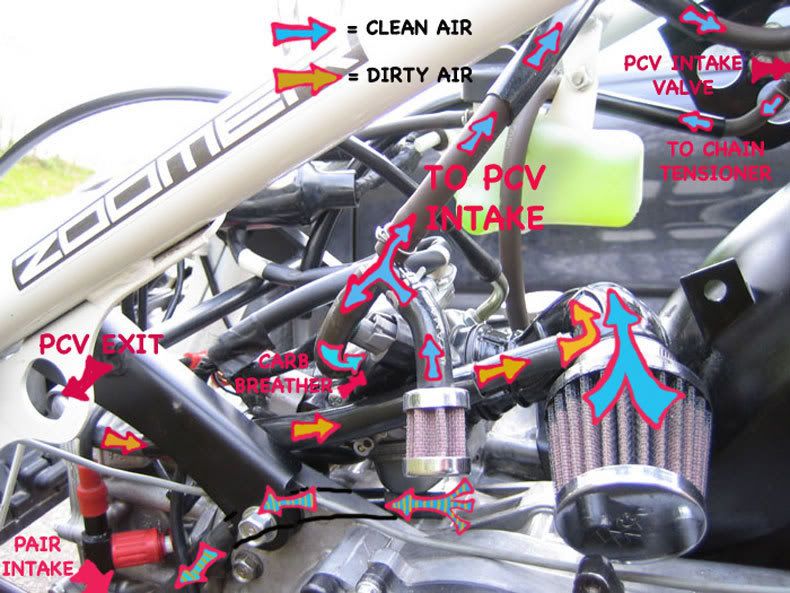
Here's a photo of my complete system. I realize it's chaotic with all the arrows but it's nice to have everything in one photo that you can just print off and take out to your scoot as you do this.
FREQUENTLY ASKED QUESTIONS:
1) Can I put the main air filter directly on the back of the carb?
A) If you want but I've tried it (and others) with usually lackluster results because the airflow isn't as smooth. I used the 45mm Daytona filter from Battlescooter which is somewhat too big to clamp directly on the carb so you either need to shim it or really clamp it on there like I did. Also, if you do this you won't easily be able to connect the PCV exit hose. I should mention a few people have been satisfied with this setup and continue to use it but I found I only make 80-90% of the power.
2) What about riding in the rain? What if my filters get wet and how do I avoid getting water in my engine?
A) Gauze type filters (as shown in this how to) do get wet in the rain which dramatically reduces their flow so your scoot will run terribly or not at all while your filter is wet. To avoid this you can either not ride in the rain (and be carefully when you wash it), make some sort of a cover that you put on during the rain (ie. out of a pop can/bottle) or use an enclosed filter instead as sold by Battlescooter. Gauze filters like these also dry really slow on their own...maybe 1-2 days but you can dry them in about 5-10min with a blow dryer.
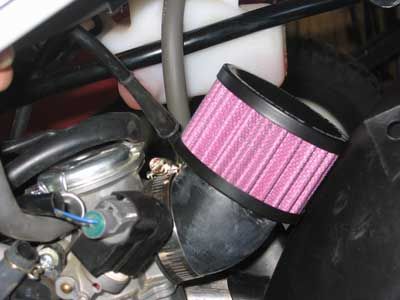
Also, it's very important that water does not get past your filters and into your engine. Make sure your filters are angled downwards (as shown in the last pic in the main part of the how to) so that even if the filter is soaked, the water won't run past.
3) How did you attach that nipple for the PCV exit hose to your main intake hose?
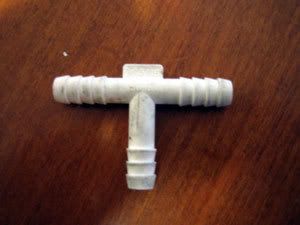
I'll post more info on this soon but essentially you cut one nipple off a T connector as shown below, leaving a bit of a lip, and then cut a hole in your intake tube and super glue this in. Use sealant too if you're not confident it's air tight.
4) How did you attach the K&N filter to your main intake hose?
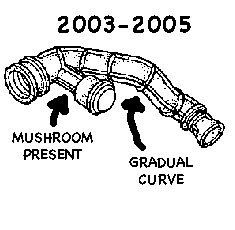
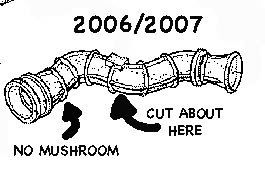
I used a 2006 intake hose which has a sharper 'elbow' than the pre-06 hoses (see post below) so I have more rear wheel clearance. I cut it off a few inches past the elbow as shown and then carefully cut the ridges off with a sharp knife so the filter would be clamping to a smooth surface. The outer diameter of the stock intake hose is 35mm so the inner diameter of your filter should be 35mm (+- 2mm). My filter is KN part RC-0790.
5) How did you run two hoses from that small filter? Where did you get the small filter?
That small filter came as part of the Pod filter kit from Battlescooter. KN sells similar filters but they aren't quite as small. You'll need to dig up one of these on your own.
To connect the 2 hoses I cut the hoses to the right length and used a T connector. They come in a variety of sizes so keep an eye out for that.

PCV SYSTEM (Postive Crankcase Ventilation):
Honda radically updated the PCV system for 2006 on North American Ruckus's. They added a one way valve/solenoid to allow the air to enter the crankcase in a different spot from where it exits. Instead of the air entering/exiting simply from the hose at the top of the valve cover, it now just exits there and it enters through the modified cam chain tensioner via the valve as shown below.

The goal of the PCV system is to remove blow by gas and oil vapours from the case and I believe it also elimates pressure spikes in the case. Compared to the oil system, this new system should keep our oil cleaner which hopefully reduces crankshaft bearing failure. The exit for the crankcase ventilation is at the top of our valve cover as shown below. You can let these gases vent to the atmosphere if you want but I strongly recommend against it because that increases your emissions a lot and contributes to smog. It's best to reuse the air exiting here and burn it to eliminate the vapours/fumes by connecting it to the main hose going to your carb and as close to the carb as possible so the vapours don't have time to condense. The three important things to remember pertaining to your PCV hoses are:
1 - Don't Allow Water In
2 - Make Sure the Intake is Getting Filtered Air
3 - Burn the Exit Gases (Please!)

PAIR SYSTEM
The PAIR system has actually been simplified for 2006. The goal of the PAIR system is to allow fresh air into the exhaust port to allow unburnt stuff to be burnt and thus reduce emissions. For 2006 you simply have a hose going to sort of a one way reed valve that leads to the exhaust port as shown below. Because this air is simply going into the exhaust port and isn't getting into the case or anything, it's not as important that the air is clean but you do want to ensure you aren't getting water in here because that would end up in your exhaust. You can eliminate this system altogether by removing the hose and plugging the valve but it's a good idea to keep it in use to save the trees. You can connect it to a source of filtered air if you want or even just chop the hose shorter as I've done and guide it to a sheltered spot under your carb so water doesn't fly in.

CARB BREATHER
The carb breather hose attaches to the left side of the carb. The way the carb works using the air is complicated but essentially it uses pressure fluctuations to raise/lower the needle. It's essential that your carb breather is getting filtered air so it doesn't get gummed up. Make sure your crankcase (PCV) exit gases aren't able to go in here.

MAIN AIR SUPPLY
Lastly, we have our main air supply for the engine. This air needs to be filtered and smooth. By smooth, I mean you don't want your filter attached directly to the back of the carb because this means you don't have the tube to smooth out the turbulance and provide a reseviour of fresh air. Your main filter inner diameter needs to be 40-45mm if you put it directly on the carb (Bad) or 35mm if you are using the stock hose.
If you want you can use one main filter and connect hoses to that for supplies of clean air to your carb breather, PCV intake and even PAIR hose but if you do this then it's important to do this UPSTREAM of where you connect the PCV exit so that the quasi-dirty exit gases do not contaminate these systems. Alternatively, you can use one or more seperate, smaller filters for your PCV, PAIR (if you want) and Carb Breather hoses and only connect the PCV exit hose to the main intake hose. An important thing to keep in mind is that you want your filters aligned so that they angle downwards so that that water from washing your scoot or riding in the rain does not enter. I once had water enter past my main filter and run down the PCV exit hose into my case which badly contaminated my engine oil. Had I not realized this immediately I could have badly damaged my engine.

Here's a link to my K&N filter below but you can view other offerings at Battlescooter or www.importationsthibault.com. Just make sure it has a 35mm inner diameter.
www.knfilters.com/search/product.aspx?Prod=RC-0790
Below is the official KN cleaner kit shown with the 'Pod' filter from Battlescooter which is expensive but nice because it already has a nipple for your PCV exit hose and it includes the small filter shown through out this how to.

Here's a photo of my complete system. I realize it's chaotic with all the arrows but it's nice to have everything in one photo that you can just print off and take out to your scoot as you do this.

FREQUENTLY ASKED QUESTIONS:
1) Can I put the main air filter directly on the back of the carb?
A) If you want but I've tried it (and others) with usually lackluster results because the airflow isn't as smooth. I used the 45mm Daytona filter from Battlescooter which is somewhat too big to clamp directly on the carb so you either need to shim it or really clamp it on there like I did. Also, if you do this you won't easily be able to connect the PCV exit hose. I should mention a few people have been satisfied with this setup and continue to use it but I found I only make 80-90% of the power.

2) What about riding in the rain? What if my filters get wet and how do I avoid getting water in my engine?
A) Gauze type filters (as shown in this how to) do get wet in the rain which dramatically reduces their flow so your scoot will run terribly or not at all while your filter is wet. To avoid this you can either not ride in the rain (and be carefully when you wash it), make some sort of a cover that you put on during the rain (ie. out of a pop can/bottle) or use an enclosed filter instead as sold by Battlescooter. Gauze filters like these also dry really slow on their own...maybe 1-2 days but you can dry them in about 5-10min with a blow dryer.
Also, it's very important that water does not get past your filters and into your engine. Make sure your filters are angled downwards (as shown in the last pic in the main part of the how to) so that even if the filter is soaked, the water won't run past.
3) How did you attach that nipple for the PCV exit hose to your main intake hose?
I'll post more info on this soon but essentially you cut one nipple off a T connector as shown below, leaving a bit of a lip, and then cut a hole in your intake tube and super glue this in. Use sealant too if you're not confident it's air tight.

4) How did you attach the K&N filter to your main intake hose?
I used a 2006 intake hose which has a sharper 'elbow' than the pre-06 hoses (see post below) so I have more rear wheel clearance. I cut it off a few inches past the elbow as shown and then carefully cut the ridges off with a sharp knife so the filter would be clamping to a smooth surface. The outer diameter of the stock intake hose is 35mm so the inner diameter of your filter should be 35mm (+- 2mm). My filter is KN part RC-0790.
5) How did you run two hoses from that small filter? Where did you get the small filter?
That small filter came as part of the Pod filter kit from Battlescooter. KN sells similar filters but they aren't quite as small. You'll need to dig up one of these on your own.
To connect the 2 hoses I cut the hoses to the right length and used a T connector. They come in a variety of sizes so keep an eye out for that.



 AS usual great how-to ;D ;D